Ransom for a kidnapped phone – $148

March 16th, 2011

With the stress and inconvenience of losing one’s mobile phone, half of those who had lost one were willing to pay an average of S$148 to get their phone back, a survey of mobile phone owners in Singapore found.

Average ransom people are willing to pay for their lost phone.That is assuming that the finder or thief offers the owner the chance to redeem their lost or stolen mobile phone. Most of the time, it’s “finders keepers” and the owners are laden with the inconvenience of reconstructing lost contact lists and worried over their private information falling into wrong hands.

Victims who have become celebrities overnight because the saucy secrets from their mobile phones have been splashed all over the Internet can attest to the stress involved.

In Singapore, where each person owns – on average – more than one mobile phone, about half (52%) of Singaporeans have lost their phones before. Despite that, only slightly more than a third (37%) currently have a password protecting their devices. These are some of the findings found by a survey commissioned by Symantec Corporation in January 2011.

With smartphones being so capable, people are relying more on them to communicate, work and play. Almost ninety percent of “Singaporeans never leave home without their mobile phones and nearly half cannot live without their phones” [Synovate 2009].

Norton Mobile Survey commissioned by SymantecThe  Norton Mobile Survey found “a whopping 89 percent of victims noting that they could neither remotely lock nor wipe the phone’s memory after the device was stolen or lost.”

“As smartphones become more pervasive in our lives, there is a greater need to protect the data on such devices.  This is one of the reasons why Norton is taking security beyond the PC to develop solutions that protect consumers, regardless of the device they use,” says Effendy Ibrahim, Internet Safety Advocate and Consumer Business Head, Asia, Symantec.

On the whole, a significant number of Singaporeans consider security factors before making a mobile phone purchase, with 72 percent noting that they are more likely to make a purchase if their mobile device or software is able to be locked remotely and has the ability to erase all the data on their device remotely.

Protection

So what does Symantec have to counter cybercriminals cashing in on increasing prevalence and reliance on smartphones? Norton Mobile Security has been introduced as part of the Norton Everywhere three-part initiative, which will address some of today’s most common issues for smartphones, including device loss and data protection.

Norton Mobile Security will allow users to locate and remotely wipe or lock their lost or stolen Android phones with a quick text message.  Consumers can currently download a free limited-trial beta version directly from the Android Market.

Go to work dressed as Lady Gaga for a week?

March 15th, 2011

This is what 17% of Singaporeans would rather do than to lose their mobile phones, a survey of mobile phone owners in Singapore found.

Other noxious things that these 17% of mobile phone owners were willing to put themselves through – rather than lose their mobile phones – include getting a root canal and eating rotten eggs.

In fact, “32 percent of Singaporeans would rather lose their childhood photographs than lose their mobile phones,” the Norton Mobile Survey found.

The Norton Mobile Survey is based on research conducted in January 2011 by The Leading Edge, an independent market research firm, on behalf of Symantec Corporation. The Leading Edge conducted an online survey among 500 adults, between the ages 18 and 54, within each of the following six markets: Singapore, India, Australia, Taiwan, China and Japan.

The Singapore sample size comprised the following:

Gender Percentage of 500 respondents
Female 51%
Male 49%
Age Group
45 to 54 years old 26%
35 to 44 years old 34%
25 to 34 years old 27%
18 to 24 years old 13%
Phone Type
Standard mobile phones 42%
Smartphones 58%
Apps on Smartphones
Average free Apps 23
Average paid Apps 3

Free BlackBerry 6 upgrade available now

March 14th, 2011

BlackBerry 6, the latest BlackBerry smartphone operating system from Research In Motion (RIM), is now available to existing owners and new customers of BlackBerry® Curve™ 3G and BlackBerry® Bold™ 9700 smartphones for free.

The new BlackBerry 6 operating system includes an intuitive user interface, enhanced web browsing experience, universal search, social feeds and an engaging multimedia experience.

BlackBerry 6 OS available for upgrade

To upgrade, existing owners of the BlackBerry Curve 3G and BlackBerry Bold 9700 can connect their smartphone to their computer and go to ap.blackberry.com/blackberry6 to download the update.

You will find detailed instructions and additional information at the website as well.

More about selection masks in GIMP (Part 7 of 14)

March 13th, 2011

The ability to make selections in photo-editing software is one of the most important aspects of these software, because it allows the user to restrict adjustments to specific parts of a photo. Understanding how selections are represented in GIMP is essential to get the most out of GIMP.

Yesterday, we selected a youth, his laptop and table using a quick mask and transferred him via copy-and-paste into another photo background.
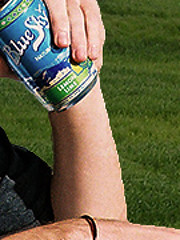
Abrupt seam because of sharp edge of the selection.

Abrupt seam because of sharp selection edge.

More seamless transition with the new background.

More seamless transition with the new background.

You might have noticed, on close inspection, that the edges looked a bit abrupt and jarring against the new background, especially where the colour of the new background was very different from that in the original background.

To make the foreground objects gel more seamlessly with the new background, you can soften the transition between the foreground objects and the background.

Feathering the selection
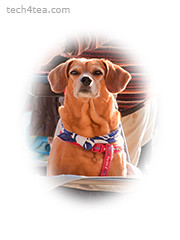
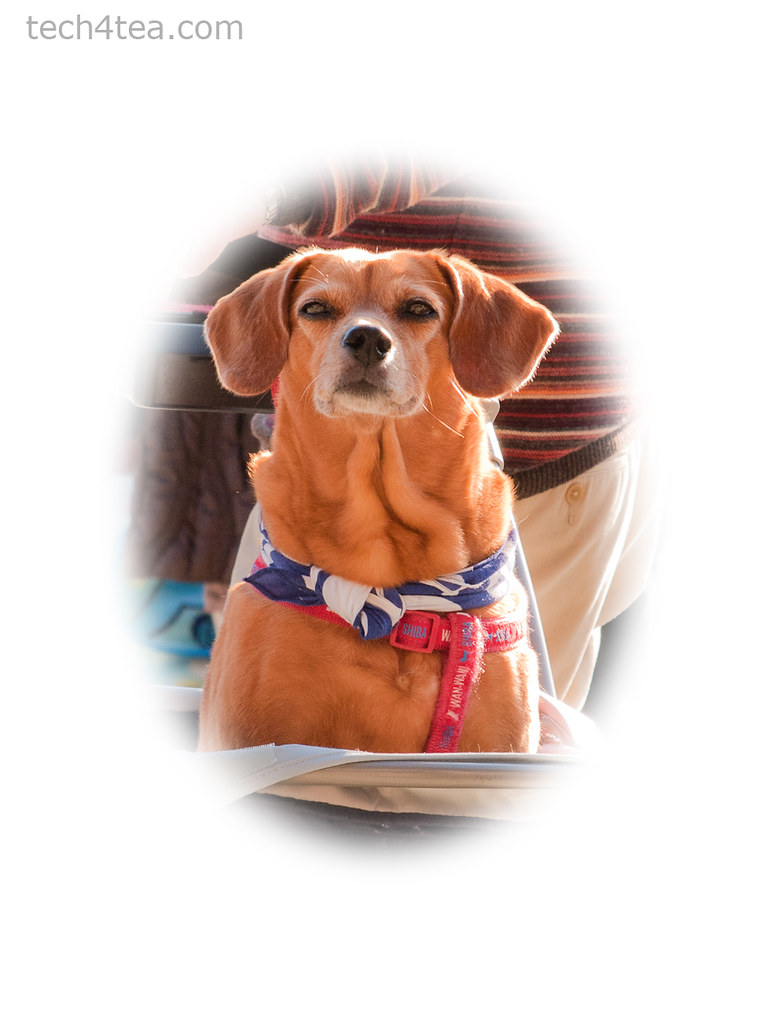
A large feather setting creates a vignette.

A large feather setting creates a vignette.

In normal selection mode, we can use the Select > Feather command to “feather” a selection before we do the copy-and-paste. This means that at the edge of the selection, the pixels go from fully visible inside the selection – to being translucent immediately on either side of the edge – to becoming totally invisible outside the selection.

How thick the translucent transition region is on either side of the selection edge depends on the feather setting used.

For yesterday’s example, the default feather amount of 5 pixels would have made the transition between the youth and the new background more natural and seamless. The transition also helps to mitigate imperfections when making the selection.

A large feather setting is used to create a vignette with a blurred edge.

Blurring a selection mask

The mask edge is sharp and abrupt.

The mask edge is sharp and abrupt.

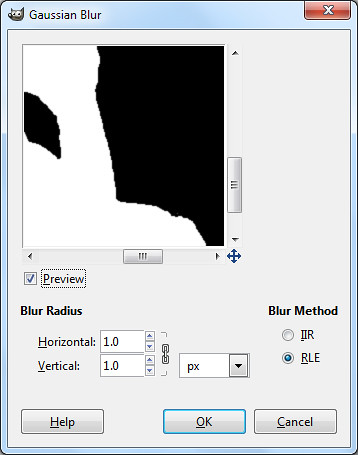
Another way of feathering a selection edge is to apply a blur filter (Filters > Blur > Gaussian Blur at 1 to 2 pixels) to the selection mask while in Quick Mask mode. While in Quick Mask mode, the filter is applied to the mask instead of the image itself – so the mask is blurred.

We’ve seen that in Quick Mask mode, the areas with translucent pink overlay means that the pixels within are not selected, whereas the areas with no pink overlay means that the pixels inside are selected.

What if we paint some areas when the Foreground colour is set to gray? A lighter shade of translucent pink will be added as an overlay but this will be lighter than the pink added when the Foreground colour is set to black. In this case the pixels in those areas will only be partially selected.
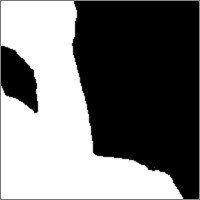
The mask edge is blurred and smoothened.

The mask edge is blurred and smoothened.

Any effects/adjustments applied to pixels that are only partially selected will only be applied partially. For example, if a region in a photo is only 30% selected, and the selected area is subsequently darkened, those pixels will only be darkened up to 30% of whatever the darkening setting would have been.

Blurring the selection mask in Quick Mask mode will blur the edges pink selection mask, so that instead of an abrupt jump from fully masked to fully unmasked, a partially masked transition region is introduced. The partially masked transition region translates to a partially selected region.

Selection masks in photo-editing software

In fact, in GIMP and other photo-editing software, selections are represented as a grayscale image called a selection mask.

The white areas represent pixels that are fully selected, the black areas represent pixels that are totally not selected, while the gray areas represent pixels that are partially selected – with the darkness of the gray representing to what extent the pixel is partially selected (between 0 and 100%).
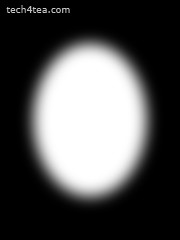
The selection mask is in grayscale.
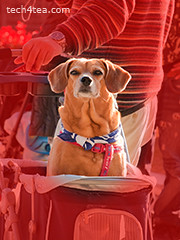
The selection mask is in grayscale.

The Quick Mask shows which parts of a photo is selected.

The Quick Mask shows which parts of a photo is selected.

The pink overlay in Quick Mask mode is a means of showing the mask, while keeping the original photo visible at the same time, so that you can tell which parts of the photo is selected and to what extent.

Saving selections for future reuse or modification

As we saw in the photo of the youth, a selection can take a lot of time and effort to create. The selection is forgotten once we make another selection. What if we need to make the same selection in the future?

A selection can be saved as a channel in the Channels dialog for future use or manipulation. If the file is then saved in GIMP’s native .xcf format, the channel is saved as part of the file. And you can save many different selections as separate channels in the file.
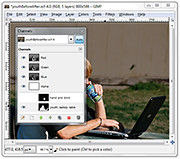
Paint on the selection mask in the image window to modify it.

Paint on the selection mask in the image window to modify it.

To save a selection for future use, first make the selection, and then click the Select > Save to Channel command from the main menu. If you look in the Channels dialog, you will see a new channel at the bottom of the dialog. The selection has been saved as a grayscale selection mask in a new channel. Double-click on the name to rename it with something more meaningful.

To modify the selection, click the eye icon to display the selection mask. Click the channel containing the mask to select it.

Any changes or painting will now be applied to the mask rather than to the image. It’s like in Quick Mask mode, except the overlay is a translucent gray by default instead of pink. Paint on the mask (in the image window) with black, white or gray as the Foreground colour to modify the mask.

To get back to editing the photo instead of the mask, remember to hide the mask by clicking the eye icon against its channel in the Channels dialog. Then go to Layers dialog and select the layer that you want to edit.
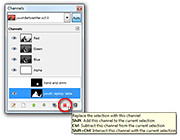
Click on the pink icon to load the mask as a selection.

Click on the pink icon to load the mask as a selection.

To load a selection, click on the selection’s channel in the Channels dialog to select it and click the pink icon to the bottom right of the Channels dialog. This will load the selection mask in that channel as a selection in the photo.

Entire books have been written just to explain how to create, manipulate and use selections, masks and channels. A good understanding of how selections, masks and channels work will open doors to harnessing GIMP’s full capabilities and start doing things that other simpler photo-editing software cannot do.

Replacing the background of a person or an object in a photo (Part 6 of 14)

March 12th, 2011

Select the person or object easily in Quick Mask mode so that he can be isolated from an ugly or distracting background, and then replace the background altogether with another photo.
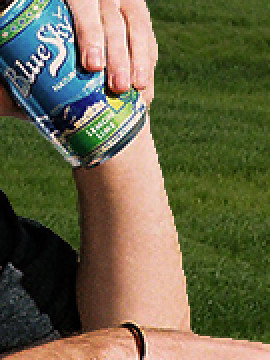
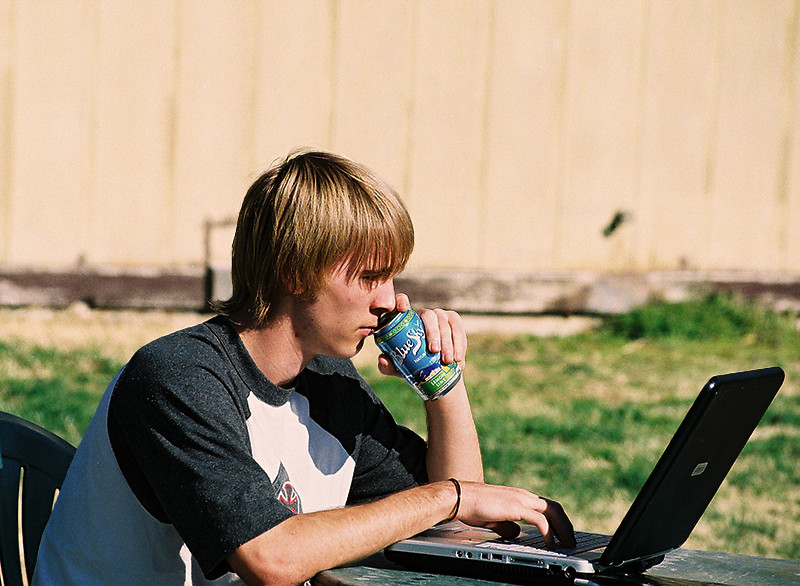
Before: Youth against a mundane background.

Before: Youth against a mundane background. Photo from morguefile.com.

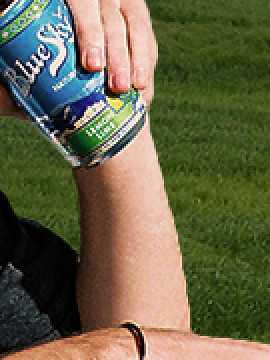
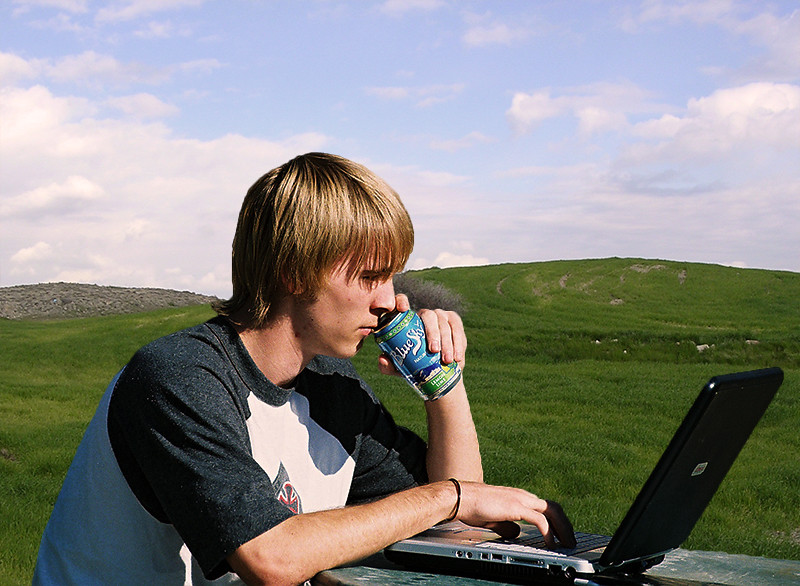
After: Background changed to something more refreshing.

After: The refreshing green fields and blue sky matches the drink he is sipping.

The many selection tools in GIMP provide different ways to make and modify selections of people or objects in photos. The selected people or object can then be tweaked and adjusted without affecting pixels outside the selection. For example, the pixels within the selection could be darkened or lightened or the colour could be made more vivid.

Sometimes, none of the selection tools we’ve covered can quite select an object properly – parts that should be selected are not selected, while pixels that should NOT be selected are selected instead.

For example, in the photo of the youth working on his laptop, we want to isolate him from the mundane background and replace the background with something refreshing. But his outline is highly irregular and complicated so the Rectangle and Ellipse Select Tools are out – unless he is a rectangular or oval android.

Make a rough selection first using the Free Select Tool.

Make a rough selection first using the Free Select Tool.

The Fuzzy Select, Select by Color, and Foreground Select Tools are also out of their depths here because there is not enough contrast between the youth and the colours making up the background.

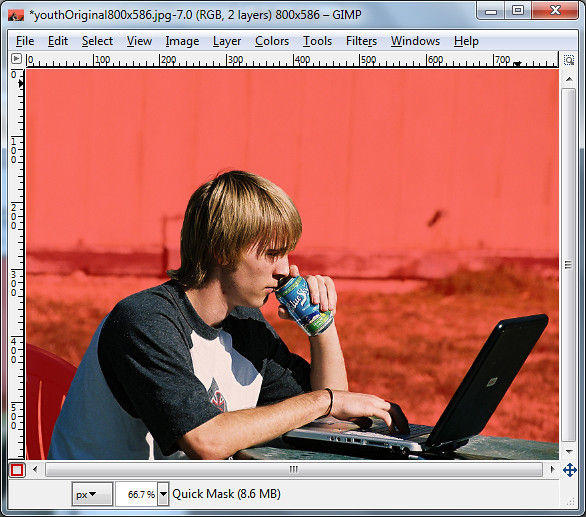
In this case, we start by using one of the usual selection tools to make a rough first-cut selection first, and then modify and perfect the selection by entering the Quick Mask mode.

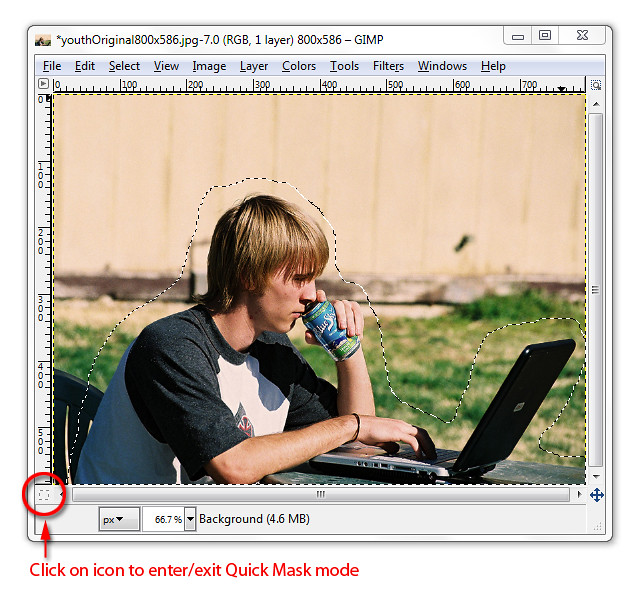
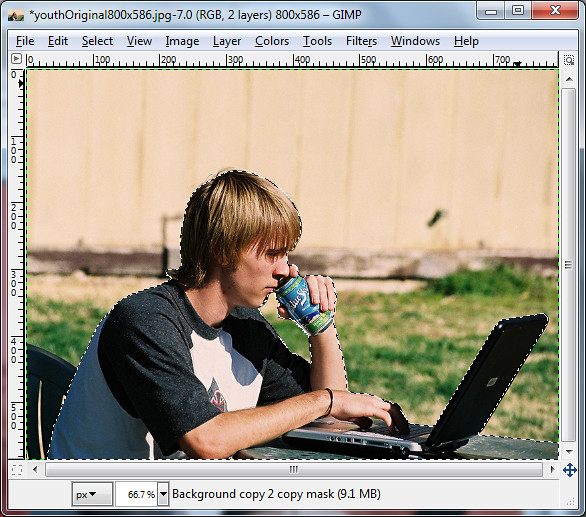
Here, I used the Free Select Tool to encircle the youth, his laptop and the table – including a small area just outside of the outline. You will see the “marching ants” indicating where the selection boundary is.

Entering the Quick Mask mode

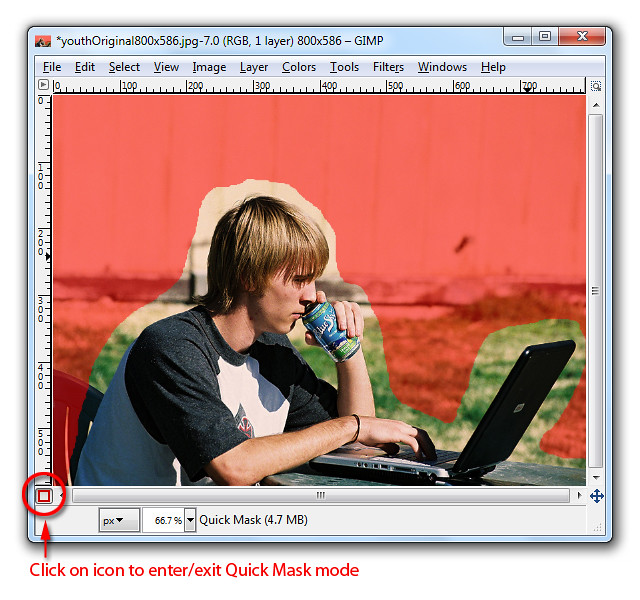
Quick Mask mode overlays unselected areas with a translucent pink.

Quick Mask mode overlays unselected areas with a translucent pink.

To enter Quick Mask mode, click on the Quick Mask icon (the small dashed rectangle icon at the bottom left corner of the image window), or press Shift-Q on the keyboard.

A translucent red tint is overlaid onto the photo showing the areas that are NOT selected.

This translucent pink overlay is called the selection mask. It works like masking tape in a physical paint job. You stick masking tape over areas where you don’t want the paint to get into, so that only the unmasked areas will be painted.

The selected areas – the youth, his laptop and the table – will be free from the red tint. Everything else that is not selected, like the grass, the chair and the wooden walls in the background are tinted temporarily with the translucent red.

Modifying and perfecting the Quick Mask

Do two things before going any further:

1. Press “D” on the keyboard to reset the colour swatches to black and white.
2. Activate the Paintbrush Tool in the Toolbox.

Zoom into the boundary area between the youth and the background to work on the details (“+” key to zoom in and Spacebar to pan). The default Foreground colour is black.

Reducing the selection

Paint on those areas on the photo that are NOT supposed to be selected but are selected – they are supposed to be overlaid by the translucent pink but are not.

As you paint, those areas will be overlaid with the translucent pink (although the Foreground colour is set to black) to indicate they have been unselected. Press the square bracket (“]” and “[“) keys to increase or decrease the size of the brush.

Adding to the selection

If you accidentally paint into the areas which is supposed to be selected, don’t worry. Click “X” on the keyboard to swap the colour swatches so that white is now the Foreground colour.

Paint on the quick mask until only the youth, his laptop and the table is not pink.

Paint on the quick mask until only the youth, his laptop and the table is not pink.

Paint over those areas that are supposed to be selected but are not – these areas are overlaid in translucent pink even though they are not supposed to be.

Instead of adding white, you will see the translucent pink erased from those areas painted, indicating that those areas are now selected.

In this way, finetune the mask, especially in the border region around the outlines, until only the youth is free from the translucent pink. Zoom in to inspect and work on the details.

You can switch between black and white for the Foreground colour by pressing X on the keyboard.

Confirming the selection

Check the marching ants selection boundary.

Check the marching ants selection boundary.

Press Shift-Q or the click on the Quick Mask icon to get out of Quick Mask mode. You will see the marching ants again indicating the selection boundaries.

The youth, his laptop and the table is now precisely selected while the background is not.

If you find the selection boundaries are still not perfect, enter Quick Mask mode again to modify the mask and get back out to check the selection boundaries. You can keep shuttling in and out of Quick Mask mode until the mask/selection is perfect.

Now any command you make within GIMP will apply only to the pixels within the selection.

Switching the background

Once you are happy with the selection, press Ctrl-C or Edit > Copy to put the selected pixels into the Clipboard.

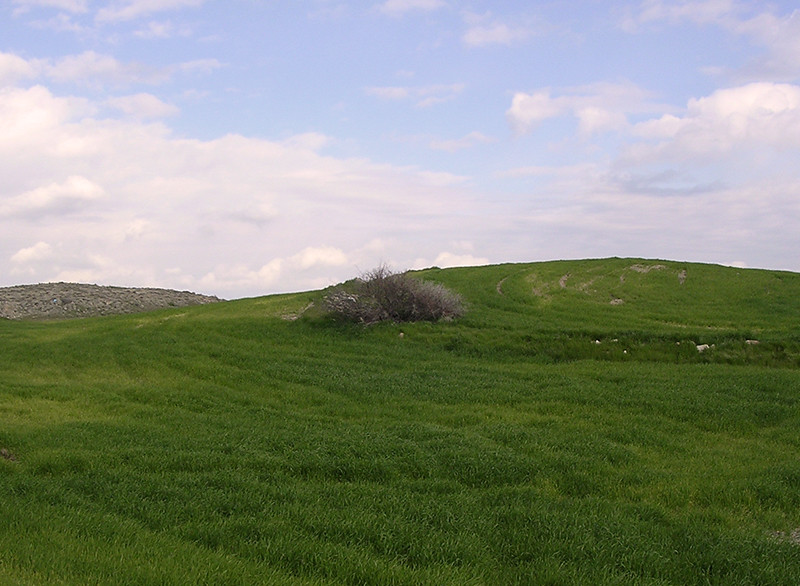
Green fields and blue skies.

Green fields and blue skies. Photo from morguefile.com

Open the new photo that will serve as the new background. Press Ctrl-V or Edit > Paste to paste the youth onto the new photo.

The pasted pixels will be added as a new temporary layer called “floating selection” that floats above all other layers in the image. In the Layers dialog, double-click the label of the floating layer type in a meaningful name and press Enter. The floating layer will be converted into a separate and permanent regular layer.

After: Background changed to something more refreshing.

After: The refreshing green fields and blue sky matches the drink he is sipping.

Activating the Move Tool from the Toolbox, you can drag the pasted layer to re-position it to the right place. You may need to resize either the new background photo or the pasted layer in order to match the sizes.

The edge of the youth may look too sharp and artificial at the moment, but we’ll address that in tomorrow’s tutorial.

RIM’s Playbook displayed in Singapore for the first time

March 11th, 2011
Two units of the beta-release Playbook were specially flown into Singapore as part of the Adobe Refresh Roadshow.

True multi-tasking using SMP for the dual-core processor.

True multi-tasking using SMP for the dual-core processor.

The beta version of the BlackBerry Playbook was first unveiled during the Adobe Max 2010 developer conference in October last year. Two units were brought in by Sarim Aziz, Senior Application Development Consultant at RIM, to make its first appearance in Singapore.

Aziz showed how the Playbook was able to mult-itask various memory/CPU intensive applications simultaneously without missing a beat.

He explained that the both of the processors in the dual-core Playbook were allowed to work simultaneously to enable true multi-tasking using Symmetric Multi-Processing – apps continue to run at full tilt even in the background without being paused.

I had the chance to play with the 0.9 lbs (425g) Playbook and here are some snapshots. Check out the details at the Playbook’s website. Essentially, it is about 9mm thick, sports front/rear cameras (3 and 5 megapixels respectively, both capable of HD video), a 1 GHz dual-core processor with 1 GB RAM.

The operating system is from QNX, which RIM acquired in Apr 2010. Both Flash and HTML5 are supported.

BlackBerry Playbook from RIM - shown for the first time in Singapore.

BlackBerry Playbook from RIM - shown for the first time in Singapore.

In terms of interface, something interesting is that the 1” black border around the 7” 1024×600 pixel screen is also touch-capable. Swipe down from the top border brings in the operating system’s menu, like the Start button in Windows – not sure if this will stay in the final product.

Tapping the lower left corner activates the soft keyboard onscreen, and swiping upwards from the bottom border displays the thumbnails of apps currently running so that you can switch to another app.

Even with 8-10 apps running, Quake was going at 60 fps without dropping frames. Apparently, should the RAM maxed out, the operating system will quietly shut down the least used App to free up memory space. Quietly – as in it won’t even ask the user.

Price-wise, we’re probably looking in the region of US$500 with launch in late March to early April for N America followed by the rest of the world.

Snapshots of IT Show 2011

March 11th, 2011

An hour into the IT Show 2011, and the exhibition halls are jam packed as anticipated. I jumped in and got what I wanted and jumped out again. Here are a few snapshots during the foray.

View from Level 6 of Suntec Singapore at the IT Show 2011Looking down from Level 6 of Suntec Singapore, you can see the sea of people going up or down the escalators and milling around. It’ll probably get much more jam-packed later in the day when people knock off from work and come visiting. The weekends will be even more crowded.

Many creased furrows can be seen as visitors pore over reams of brochures and price lists to sniff out the best deals. Many can be seen on the phone, checking prices elsewhere, or asking friends whether they needed something that’s been offered at an irresistible promotion.

The motley crowd at the IT Show 2011 at Suntec Singapore
Some early birds have already bought what they wanted, and I can see some buyers who are not waiting till they get home to unbox – some are whipping out their purchases and powering them up there and then – right outside the exhibition halls.
Standing talking advertisement for iPhone accessories
Perhaps if you find you’ve bought a lemon, you can immediately pop back in for a replacement or a refund. But the security was not as sympathetic – shortly after this snapshot, the guard was seen going around evacuating them from where they’d been squatting. 

Prior to this, I’d only seen walking, talking placards on the streets of London. But right here in Singapore, we have our very own standing, talking advertisement selling iPhone accessories hanging down his neck. Bravo!

Adobe Refresh Roadshow in Singapore

March 10th, 2011
Two product “evangelists” and the Product Manager of Flash Professional show designers and attendees how to design once but deploy to different hardware and software platforms and screen sizes.

Instead of designing for the standard desktop monitor at standard screen resolutions, end-users are accessing web content using a whole range of devices with different screen sizes/resolutions, and on different hardware and software platforms.

Adobe Refresh Roadshow on 10 Mar 2011 in SingaporeThese devices range from the traditional PC to the whole range of smartphones and more recently the tablets and web TVs.

Richard Galvan, Product Manager - Flash ProfessionalFlash Professional Product Manager, Richard Galvan, went through the trends of the day and predicted that the number of people surfing the Internet using smartphones and tablets will surpass the number using PCs by 2013 – maybe earlier.

He demonstrated how the existing and upcoming versions of Adobe’s Flash Professional and Flex application development platform facilitates the ability to develope apps only once but deploy to devices running different operating systems such as Google’s Android, Apple’s iOS and RIM’s BlackBerry.

Paul Burnett, APAC Evangelist - Adobe Systems IncMichael Stoddart, APAC Evangelist - Adobe Systems IncThe product “evangelists” Paul Burnett and Michael Stoddart also illustrated how the software assisted coders by providing features such as code hints, code completion and code snippets – so much so that even designers could have a go at the coding.

RIM's BlackBerry Playbook  displayed in Singapore for the first time.Some of the sneak peeks of features being explored for future products were also presented. Some of these were first shown in Adobe Max 2010 developer conference in October last year.

The beta version of the BlackBerry Playbook, which made its first appearance during Adobe Max, was also displayed for the first time in Singapore.

Photoshop on a tablet?

Photoshop on a tablet?

Galvan also gave a demo on the recently released Wallaby – an experimental piece of software for converting Flash files into HTML5.

The simple animation he converted were identical before and after conversion – handy for banner ads without audio, video, or ActionScript.

Multi-touch interface for a future version of Photoshop?

Multi-touch interface for a future version of Photoshop?

Galvan believed that Flash and HTML5 were complementary instead of being mutually exclusive. He emphasised that Flash and HTML5 will continue to complement each other into the future, with Flash providing additional features and capabilities to HTML5 based content.

The roadshow was held at the NTUC auditorium at One Marina Boulevard from 8.30am to 5.30pm.

Singapore IT Show 2011

March 10th, 2011

The first of 4 IT exhibitions in Singapore is here. The IT Show 2011 will run from 10 – 13 March (Thursday to Sunday) at Suntec City (Levels 1, 2, 3, 4 and 6) from 12 pm to 9 pm daily.
IT Show 2011, 10-13 Mar, Suntec Singapore (Levels 1,2,3,4,6) There will be more than 830 exhibitors in the 350,000 square feet of space distributed over five levels of Suntec Singapore. Sales are expected to increase to more than S$70 million, from S$67.5 million last year. 830,000 visitors are expected this time round, up from 807,000 last year, revealed Mr Melvin Koh, general manager of Exhibits Inc.

The four major IT exhibitions in Singapore are:

Exhibition Dates Venue
IT Show 2011 10-13 Mar Suntec Singapore
PC Show 2011 9-12 Jun Suntec Singapore
COMEX 2011 1-4 Sep Suntec Singapore
SITEX 2011 24-27 Nov Singapore Expo

Flash-to-HTML5 conversion tool from Adobe

March 9th, 2011
At long last, Adobe has released an experimental piece of software codenamed Wallaby that can convert Flash files into HTML5. It’ll be interesting to see how the Flash vs HTML5 rivalry pens out.

HTML5 logoThis tool was first demo-ed at Adobe Max 2010 developer conference in October last year. The cross-platform AIR app is available for free download as a technology preview for developers.

Wallaby allows Flash developers to deployFlash content on Apple iOS devices like iPads and iPhones, which has banned Flash on Steve Jobs’ accusations that it is vulnerable to exploits, battery draining, and prone to frequent crashes.

Flash logoFLA files from Flash can be instantly converted to HTML5 by a simple drag-and-drop. The HTML can then be edited in Dreamweaver or any HTML authoring tool.

Tom Barclay, senior product manager for Flash pointed out that not all elements from Flash files will make it into HTML5. Although the overall look and feel can be ported, much will be discarded in the migration.

The Wallaby Release Notes describe what features are supported, what differences we have already discovered between the various browsers, what device variations have been found, and any currently known issues.
Adobe logo What is thrashed: audio, video, ActionScript, as well as blend modes and filters (apart from simple alpha), dynamic masks, some Text Layout Framework text, and 3D tweens and transforms.

What is supported: vector art and images, classic text, keyframes, MovieClips and graphics, classic motion and shape tweens, rollover buttons, and instance names.

Immediate application of the tool would mainly be for making basic banner ads and animations, especially if the FLA files have already been developed.

iAds ProducerApple had released iAd Producer in December last year. It is a free tool “for online advertisers to create content for Apple’s iAd platform, helping the company to establish HTML5 as a viable alternative to Adobe Flash technology on mobile devices,” wrote Daniel Ionescu of PCWorld.


iAd Producer is a visual HTML5 authoring tool, available to Apple developers for producing advertisements for iOS devices, using a combination of HTML5, Javascript and CSS3.