Archive for the ‘GIMP Intermediate Series’ Category

Using Curves to enhance brightness and contrast in GIMP (Final Part 14 of 14)

Sunday, May 15th, 2011
Both the rudimentary Brightness-Contrast command and the handy Levels command allows you to enhance the tonal balance of a photo and for correcting colour balance. But the Curves command gives you ultimate control over how specific tones are to be tweaked in your digital photo.

The Levels command allows the user to adjust the three main tonal ranges of a photo – the shadows, midtones and highlights. The Curves tool, however, allows you to target any tone or tonal range in the photo to tweak their brightness and contrast.

Using the Curves command

With the photo open in GIMP, choose the Colors > Curves command (or Tools > Color Tools > Curves)  from the main menu. An “Adjust Color Curves” dialog box pops up showing a square grid with a straight diagonal line. The histogram of the photo can be seen in the background of the grid for reference.

As for the Levels command, an understanding and analysis of the histogram of the photo is the basis for using the Curves command.

The horizontal X-axis of the grid represents the initial brightness values – from zero (black) to 255 (white) – of the pixels in the photo before the Curves command is applied. The vertical Y-axis represents the brightness values that each pixel is to be mapped into after the adjustments have been applied. It also ranges from zero to 255.

The lower left corner of the grid represents the black point (for pixels with brightness value zero) while the upper right corner represents the white point (for pixels with the maximum brightness value of 255).

Adjusting brightness

To begin adjusting the photo, click anywhere on the diagonal line in the grid. An anchor point is added to the line. You can drag the anchor point around with the mouse.

Drag the point downwards to make the photo darker. The straight diagonal line turns into a curve passing through the anchor point and the black and white points. A faint straight diagonal line is still visible in the grid – it serves as reference for an unadjusted photo.

When the cursor is inside the grid, you can see the X (input) and Y (output) values of the cursor at the top left hand corner of the grid. Mouse-over the anchor point that you’ve just dragged. In the example, you can see that the brightness of any pixel with original value 128 (X-value) will be reduced to 160 (Y-value). Pixels with brightness close to 128 will also be darkened. You can eyeball the effects of the adjustments by looking at the photo itself in the image window.

To lighten the photo, drag the anchor point down below the faint diagonal guide. Now pixels with brightness 128 will be darkened to 90, while the pixels of similar brightness will be darkened as well.

To remove an anchor point, simply drag it off the side of the grid. You can add as many as 14 anchor points (excluding the original black and white points) to the curve. This allows you to target up to 16 specific brightness values in the photo for brightening or darkening. However, you seldom need more than a handful anchor points to get the job done.

Adjusting contrast

If the histogram is bunched up the towards the middle, drag the black or points inwards horizontally to where the histogram begins and ends respectively. This is similar to dragging the black and white points of the Levels command inwards to maximise the tonal range of the photo.

The steeper gradient of the line indicates that the contrast of the photo is increased.

A typical Curves adjustment that can be applied to most photos is the “S-Curve”. This curve tends to enhance most photos by increasing the overall contrast and making the photo “pop” with vivid shadows and highlights.

To apply an “S-Curve” adjustment, add two points on the Curve – the first to lower the brightness of pixels of brightness 64, the second to increase the brightness of pixels of brightness 192. The above numbers are just guides – drag the adjustment points around with the mouse while eyeballing the photo.

The S-Curve suppresses the shadows and highlights while increasing the contrast of the mid-tones, where the main subject usually is. Add a third point with brightness of roughly 128 to increase or decrease the brightness of the midtones.

In addition to these adjustment points, you can add additional adjustment points to tweak specific tones in the photo – such as skin tones.

With some practice, you will be able to control and enhance any particular tone that appears in your photo.

Final installement of Intermediate GIMP series

Sunday, May 8th, 2011

The final installment of the 14-part Intermediate GIMP series will be run next weekend.

After more than a week of following the Singapore General Election 2011 and staying up past 3 am to watch the results, I’m afraid I’ve had to postpone the final installment of the Intermediate GIMP series till next weekend.

It will be on using the advanced Curves command to correct/enhance the brightness and contrast of a photo.

Using Levels to enhance brightness and contrast in GIMP (Part 13 of 14)

Sunday, May 1st, 2011
The Levels command is the tool of choice for more advanced users of photo editors for enhancing the tonal balance of a photo and for correcting colour balance.

That’s because it offers better control than the rudimentary Brightness-Contrast command and produces much better results.
The port of Marseilles in Southern France on an overcast evening.

Pict 1: The port of Marseilles in Southern France on an overcast evening.

The overall contrast and brightness has been increased with the Levels command.

Pict 2: The overall contrast and brightness has been increased with the Levels command.

Most free and basic photo editors offer a basic Brightness/Contrast command that allows the user to easily adjust the brightness and contrast of a photo. GIMP tool also has the equivalent in the Colors > Brightness-Contrast command from the main menu.

This basic adjustment command uses a rudimentary algorithm that treats all pixels equally and adjusts them to the same extent. It’s useful if all you need is a quick and dirty adjustment to the photo.

For almost the same effort, the Levels command provides better control and the algorithm yields better results adjusting pixels to different extents depending on the settings you make.

That is why for many free photo editors, more advanced tools like the Levels and Curves command are not available or are only available when you upgrade to a paid version. In GIMP, these tools available for free.

Using the Levels command

This photo of a hanging potted plant is slightly underexposed because the camera has been fooled by the bright background.

Pict 3: This photo of a hanging potted plant is slightly underexposed because the camera has been fooled by the bright background.

The red petals are now more vibrant and discernible after the photo has been enhanced with the Levels command in GIMP.

Pict 4: The red petals are now more vibrant and discernible after the photo has been enhanced with the Levels command in GIMP.

Last week, we looked at how to analyse a photo’s characteristics and problems by examining its histogram in GIMP.

Using the histogram as a basis, we’ll learn to use the Levels command to improve the tonal distribution of a photo such that the overall brightness and contrast of the photo is just right and the entire range of brightness values (from 0 to 255) available is fully utilised.

With the photo open in GIMP, choose the Colors > Levels command from the main menu. A complicated looking Levels dialog box pops up showing a histogram of the photo as well as many controls and input fields to control the histogram is to be adjusted.

The reason why many beginners hesitate to use the Levels command is the seeming complexity of the dialog box. But in most cases, all you need is to drag one to three of the triangular sliders directly below the histogram. Here’s how.

Darkening a photo

Busy bee working on Lavender flowers in Provence, France.

Pict 5: Busy bee working on Lavender flowers in Provence, south of France.

Photo darkened using the Levels command in GIMP.

Pict 6: The photo after darkening using the Levels command in GIMP.

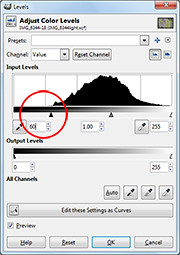
For the slightly overexposed photo of the lavender flowers, the histogram shows that none of the brightness values below 60 is utilised. Drag the blackpoint triangular slider from the left edge inwards towards the right until it is at the point where the main bulk of the histogram starts to form (see Pictures 5 to 7).
Drag the triangular blackpoint slider from the left edge inwards towards the right.

Pict 7: Drag the triangular slider from the left edge inwards towards the right.

The three boxes below the histogram shows the numeric brightness values of where the sliders are. It serves as a reference or when you need to key in specific numeric values to use. Most of the time, you should simply drag the slider inwards based on where the bulk of the histogram begins.

Dragging the blackpoint slider to 60 tells GIMP to darken pixels of brightness 60 and below down to zero. The other pixels in the histogram are correspondingly darkened as well. This also increases the overall contrast of the photo because a wider range of brightness value is now used in the photo.

To further finetune the brightness of the photo, drag the centre slider to the left or right to lighten or darken the mid-tones.

Lightening a photo

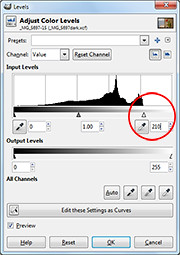
Drag the triangular blackpoint slider from the right edge inwards towards the left.

Pict 8: Drag the triangular slider from the right edge inwards towards the left.

For the slightly underexposed photo of the potted flower on the wall, the histogram stops short at around the brightness level 210. Drag the whitepoint triangular slider from the right edge inwards towards the left until it is at the point where the main bulk of the histogram ends (see Pictures 3, 4 and 8 ).

Dragging the whitepoint slider to 210 tells GIMP to set 210 as the white point – all pixels that are of brightness 210 and greater are increased to the maximum of 255. The other pixels are correspondingly lightened as well.

As before, the overall contrast of the photo is increased because the entire range of brightness values is now used in the photo.

Again, drag the centre slider to the left or right to lighten or darken the mid-tones further.

Adjusting all three sliders

The snapshot of the port of Marseilles was taken on an overcast evening and is not only too dark but sorely lacking in contrast, resulting in a dull and flat photo (See Pictures 1 & 2).

The histogram is now spread across the entire range of brightness.

Pict 10: The histogram is now spread across the entire range of brightness.

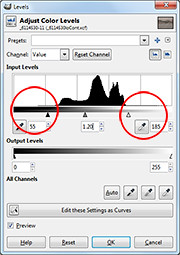
The histogram in the Levels dialog box shows that all the pixels are bunched up in the mid-tones – there are now extreme white or black pixels – so the highlights are not bright enough while the shadows are not dark enough.

Drag the blackpoint and whitepoint triangular sliders from both edges inwards.

Pict 9: Drag the blackpoint and whitepoint triangular sliders from both edges inwards.

In this case, drag the blackpoint and whitepoint sliders inwards to where the bulk of the histogram begins and ends (see Picture 9). This darkens the shadows and lightens the highlights forcing the bunched up histogram to spread out across the entire range of brightness – thereby increasing the overall contrast of the photo.

As the photo is still too dark, drag the centre slider to the left to further brighten the photo.

The resulting histogram after the adjustment is now spread out across the entire brightness range (see Picture 10).

Understanding histograms (Part 12 of 14)

Saturday, April 23rd, 2011
The histogram of a photograph tells you whether a photo is too bright, too dark or too flat and lacking in contrast.

It forms the basis of more advanced and powerful tools – such as Levels and Curves –  to enhance the brightness and contrast of a photo.
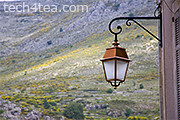
Metalwork lantern in French Provence. The exposure was reasonably well-balanced.

Pict 1: Metalwork lantern in French Provence. Exposure was well-balanced, as indicated by the histogram below.

Many digital cameras today can display histograms on their LCD screens in both the review and preview modes. The histogram helps the photographer to assess whether the exposure settings for an image are optimal. This is most useful when bright sunlight makes it difficult to judge – just by viewing the photo preview/review on the LCD screen – whether a photo is too bright or dark.

If the histogram indicates that the photo is too dark or bright, the photographer can adjust the exposure settings to get a better shot.

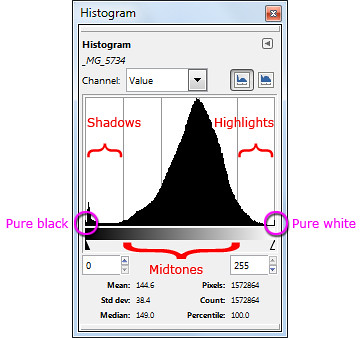
Different parts of a histogram. The photo is well-exposed.

Pict 2: Different parts of a histogram. The photo of the metal work lantern was well-exposed.

What is a histogram?

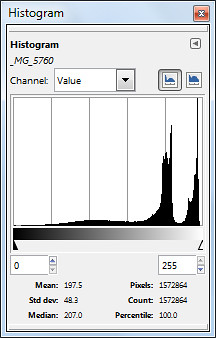
The histogram is basically a graph of the brightness levels of all the pixels in a photograph – from pure black (brightness value zero) on the left edge to pure white (brightness value 255) on the right edge.

An overexposed photo has its histogram bunched up to the right.

Pict 4: An overexposed photo has its histogram bunched up to the right.

Lavenders in the French Riviera - overexposed.

Pict 3: Lavenders in the French Riviera - overexposed.

The number of pixels in each of the 256 levels of brightness are counted and plotted on the Y axis as a bar chart to provide an idea of the tonal distribution of a photograph and its possible problems.

The region around the left edge of the histogram represents the shadows (dark tones) in the photo while the pixels near the right edge represents the highlights (bright tones). The middle region represents the midtones.

Analysing a histogram

When a photo is opened in GIMP, you can view the photo’s histogram by selecting the Windows > Dockable Dialogs > Histogram command from the main menu. By analysing the histogram, you can better decide how to use the tools in GIMP to enhance a photo’s brightness and contrast.

Flowers at Gourdon - underexposed.

Pict 5: Flowers at Gourdon - underexposed.

Port of Marseille on a dull and overcast day.

Pict 6: Port of Marseille on a dull and overcast day.

All bunched up in the middle - poor contrast.

Pict 7: All bunched up in the middle - suggesting a photo with poor contrast.

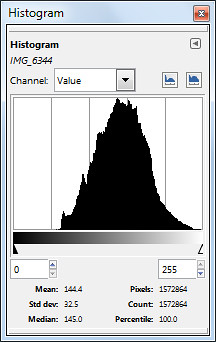
A well-exposed photo usually has a histogram which looks like a bell-shape and which stretches from one end of the histogram to the other (see Pictures 1 & 2).

A photo that is overexposed (too bright) usually has a histogram that is bunched up on the right, while an underexposed photo will have a histogram that’s bunched up to the left (see Pictures 3 to 5).

A photo with poor contrast will usually have a histogram that is squashed up towards the middle. The photo appears dull and flat. The brightest pixels are not bright enough while the darkest pixels are not dark enough (see Pictures 6 & 7).

Exceptions

Note that there are exceptions under special photographic situations. For example, a photo that comprises mainly bright tones (such a scene comprising white snow against a light coloured sky) can have a histogram that is bunched up to the right, even though it is properly exposed (see Pictures 8 & 10).

Eagle perched atop Gourdon.

Pict 8: Eagle perched atop Gourdon.

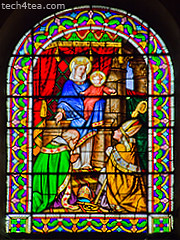
Stained glass window in Provencal church.

Pict 9: Stained glass window in Provencal church.

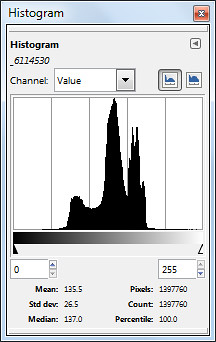
Similarly, a photo consisting of predominantly dark tones can have a histogram that is bunched up on the left – even when properly exposed (see Pictures 9 & 11).
 Bunching up to the right caused by bright background behind the eagle despite proper exposure.

Pict 10: Bunching up to the right caused by bright background behind the eagle despite proper exposure.

Stained glass window in Provencal church.

Pict 11: Histogram is bunched up because of the predominance of dark tones - despite proper exposure.

In the next  installment, we’ll use the Levels command to enhance a photo’s brightness andcontrast based on the characteristics of its histogram.

Designing a poster in GIMP (Part 11 of 14)

Saturday, April 16th, 2011
Layers and layer masks are what differentiates a powerful image editor like GIMP from a basic photo editor. Design a poster for your living room from your favourite photo.
Make a poster or postcard from your favourite photo.

Make a poster or postcard from your favourite photo.

Ever wanted to make a postcard or a poster from your favourite photo? Here are some techniques using layers and layer masks in GIMP.

Add a grid of white dots

Open the photo in GIMP. From the Layers dialog, you can see it resides in the Background layer which is the only layer for the moment.

The original photo from morguefile.com.

The original photo from morguefile.com.

A grid of white dots is overlaid onto the photo.

A grid of white dots is overlaid onto the photo.

Add a new layer by clicking the icon at the bottom left corner of the Layers dialog. In the “New Layer” dialog box that pops up, select the radio button for “White” option under Layer Fill Type and press the OK button.

A new empty layer filled with white is added above the original photo in the Background layer.

Right-click on its thumbnail in the Layers dialog and select “Add Layer Mask” command from the pop-up menu. In the “Add Layer Mask” dialog box that pops up, select the “White (full opacity)” option and press the OK button. A layer mask filled with white is added to the layer – you can see its thumbnail beside the original thumbnail in the Layers dialog.

Use the Grid filter to create the grid of white dots.

Use the Grid filter to create the grid of white dots.

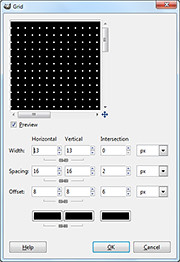
From the main menu, select the “Filters > Render > Pattern > Grid” command. In the Grid dialog box that pops up, increase the horizontal width setting until the preview in the dialog box shows a grid of white dots of the desired size. Here I used a setting of 13.

The white layer now appears as a grid of white dots overlaid on the original photo.

Right-click on the upper layer in the Layers dialog and select “Apply Layer Mask” to merge the layer mask into the original solid white layer. The layer mask is removed and the layer becomes a transparent layer with a grid of white dots overlaid on the photo below.

Hiding the white dots from the heads and faces

Use a layer mask to hide the white dots from the heads and faces.

Use a layer mask to hide the white dots from the heads.

Add a new layer mask on this layer, again selecting the “White (full opacity)” option in the  “Add Layer Mask” pop-up dialog box.

Press “D” on the keyboard to reset the Foreground colour to black. Activate the Paintbrush Tool from the Toolbox and paint on the layer mask in the image window. Paint around the heads and faces of the wedding couple to hide the white dots in that area.

From the main menu, select the “Layer > New from Visible” command to create a new layer that combines all the visible layers in one layer.

Adding the green arc

In the Layers dialog, click to select the layer below the new combined layer. This is so that any new layers created will be added BELOW the combined layer.

Zoom out until the photo is smaller than the image window.

Zoom out until the photo is smaller than the image window.

Set the Foreground colour to green (or your preferred colour). Add a new layer by clicking the icon at the bottom left corner of the Layers dialog. In the “New Layer” dialog box that pops up, select the radio button for “Foreground color” option under Layer Fill Type and press the OK button.

A new layer filled with green is added just below the combined layer.

Right-click the combined layer in the Layers dialog to add a layer mask to the layer, using the “White (full opacity)” option. Press the minus key (“-”) on the keyboard to zoom out the view in the image window.

As the photo becomes smaller than the image window, you will see white space between the edges of the photo and the edges of the image window.

Adding a green arc at the bottom of the poster.

Adding a green arc at the bottom of the poster.

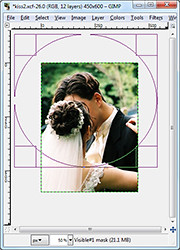
Activate the Ellipse Select Tool from the Toolbox and drag an elliptical selection around the couple’s heads. You can begin dragging in the white space between the photo and the edge of the image window so that the elliptical selection covers most of the photo except for a small arc at the bottom of the photo.

Remember you can adjust the size and position of the elliptical selection by dragging the side or corner control handles of the selection outline. Once happy with the selection, use the “Select > Invert” command from the main menu to invert the selection.

Press “D” on the keyboard to reset the Foreground colour to black. Select the “Edit > Fill with FG Color” command to fill the arc with black (in the layer mask).

An arc of green is revealed below the photo.

Adding the white highlight

Click on the green layer in the Layers dialog to select it.

Add a white highlight band in the green arc.

Add a white highlight band in the green arc.

Add another new layer, this time selecting the radio button for “White” option under Layer Fill Type. The new white layer is added above the green layer but below the combined layer.

Add a layer mask to the white layer, selecting the “Black (full transparency)” option in the pop-up dialog box. A layer mask filled with black is added to the layer.

Press “D” to reset the Background colour to white. Using the Rectangle Select Tool from the Toolbox, select a vertical band and use the “Edit > Fill with BG Color” command from the main menu. A white band is added to the layer mask such that a white band runs through the green arc.

Adding the text captions

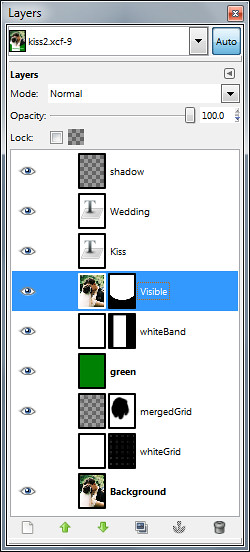
GIMP's Layers dialog.

GIMP's Layers dialog.

Click the combined layer (the topmost layer) in the Layers dialog to select it, so that any text captions added will be added above it.

Activate the Text Tool from the Toolbox. In the Tool Options below the Toolbox, set the font, size and colour settings for the Text Tool. Click in the white band in the arc with the cursor and type the word “Wedding”. Click in the green portion to add the word “Kiss”.

After adding the captions, you can still change the font, size and colour setting for these captions by selecting them first with the Text Tool and then modifying them in the Tool Options.

Add edge shadow

Add a new empty layer right at the top of all other layers. Activate the Blend Tool from the Toolbox. Press “D” to reset the Foreground colour to black and the gradient to “FG to Transparent”.

Again, zoom out the photo (by pressing the minus key on the keyboard) until the photo is smaller than the image window. Drag a black-to-transparent gradient from outside the right edge of the photo (but inside the right edge of the image window) to slightly inside the right edge of the photo.

Save the file in .xcf format so that you can come back to tweak the design in the future. Save as .jpg to send the file for print at the studio.

Compositing your photos in GIMP (Part 10 of 14)

Saturday, April 9th, 2011
Composite various photos into a collage by making them merge seamlessly together – using Layers and Layer Masks in GIMP. Today, we’ll try a simple fading effect and merge two photos int0 each other.
Composite two photos seamlessly together using GIMP.

Composite two photos seamlessly together using GIMP.

Now that you have learnt about Layers and Layer Masks, there are many tasks and effects that you can do using them. I had some questions from readers about how to apply certain effects to their photos so that they can use them in their websites.

Morning dew on flowers at our hotel in Provence, France

Morning dew on flowers outside our hotel in Provence, France

Fading to white allows captions to be added.

Fading to white allows captions to be added.

They’d seen these simple effects being done on other websites and would like to find out how they’re accomplished. In these two parts, we’ll try some that involve compositing a few photos together.

Fading a photo to white (or any other colour)

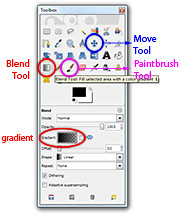
This is easy. After opening the photo in GIMP, activate the BlendTool in the Toolbox.

The Blend, Move and Paintbrush tools are in the Toolbox.

The Blend, Move and Paintbrush tools are in the Toolbox.

In the Tool Options below the Toolbox, click on the rectangle beside the “Gradient” label and from the dropdown list of options, select “FG to Transparent” gradient.

Click on the Foreground Swatch in the Toolbox and select white from the “Change Foreground Color” dialog box that pops up. If you want the photo to fade to black, red or any other colour instead of white, simply select that colour and set that as the Foreground colour.

Now move the cursor to the image window and drag it from the left side of the photo to the right. A gradient going from pure white to nothing is overlaid onto the photo so that it appears as if the photo is fading into white. If you are not satisfied with the fading, press Ctrl-Z to undo and try dragging again. Trial and error is the best way to get your ideal fading effect.

To fade in more gradually, drag further. You can of course drag from right to left or drag vertically or diagonally – depending on how you want the fading effect to appear.

The disadvantage of this quick-and-dirty method is that the gradient is added directly onto the photo. Once you’ve saved and closed the file, you can’t adjust the fading effect to reveal more of the original photo anymore.

Applying the gradient on a separate layer

Here’s a non-destructive approach that allows the fading effect to be tweaked six months down the line.

Instead of applying the gradient directly to the photo in the Background layer, apply it to a new empty layer above the Background layer. This way, none of the pixels in the original photo in the Background layer is changed or “destroyed”. The fading effect can be changed anytime in the future by replacing or modifying the colour and gradient in the upper layer.

Here are the steps.

Apply the gradient to an empty layer above the photo.

Apply the gradient to an empty layer above the photo.

Add a new layer by clicking the icon at the bottom left corner of the Layers dialog. In the “New Layer” dialog box that pops up, select the radio button for “Transparency” option under Layer Fill Type and press the OK button.

A new empty layer is added above the original photo in the Background layer.

Use the Blend Tool to add the gradient to the new empty layer.

The result is that the photo appears to fade into white. You can further finetune the overall effect by using the Move Tool from the Toolbox to move either the photo in the Background layer or the gradient in the upper layer.

Simply activate the Move Tool from the Toolbox, click to select the layer you want to move in the Layers dialog, and drag in the image layer to make the move. You may find it easier to first change the default option of the Move Tool to “Move the active layer” to better control which layer you want to move.

Merging two photos into each other (non-destructively)

Little house on the prairie? More like ruins in a field of lavender.

Little house on the prairie? More like ruins in a field of lavender.

This intelligent Spaniel named Bugis lives on the lavender fields of the Valensole plateau.

This intelligent Spaniel named Bugis lives on the lavender fields of the Valensole plateau.

Pleasant memories from our drive through Valensole in Provence

Pleasant memories from our drive through Valensole in Provence

To merge two photos into each other, simply place one photo as a layer above the other photo. Add a layer mask to the upper layer and use the Blend Tool to apply a gradient to the layer mask. The two photos will appear to blend into each other.
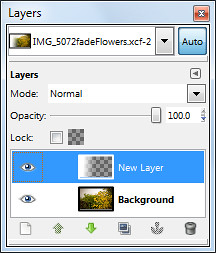
Here are the steps.

Open the first photo in GIMP. The photo resides in the Background layer which is the only layer in the Layers dialog for the moment. Bring in the second photo as a new and separate layer by using the “File > Open as Layers” command from the main menu. The new layer sits above the first photo in the Background layer.

Right-click the image thumbnail for the upper layer in the Layers dialog. In the pop-up menu, select “Add Layer Mask”. In the Add Layer Mask dialog box that pops up, press the Add button – any of the options in the dialog box for initialising the layer mask is fine since we will be modifying the layer mask immediately after creating it.

Press “D” on the keyboard to reset the foreground and background colours to black and white respectively.

Activate the Blend Tool from the Toolbox using any of the three “FG to BG” gradients in the Tool Options. Because the layer mask is active, dragging the Blend Tool in the image window will add the gradient to the layer mask instead of the white layer itself. The layer mask hides part of the photo in the upper layer based on the gradient in the layer mask. The result is that the two photos appear to fade into each other.

Again, none of the pixels in the two photos are altered or “destroyed”. The fading effect can be changed anytime in the future by modifying the gradient in the layer mask of the top layer.

I've modified the layer mask by painting with the Paintbrush Tool.

I've modified the layer mask by painting with the Paintbrush Tool.

You can further modify the blending by using the Paintbrush Tool from the Toolbox to paint either black or white into the layer mask. Remember – white reveals the pixels in the upper layer while black hides. Shades of gray makes the pixels in the upper layer translucent.

As before, you can also use the Move Tool to move either of the photos around.

Digitally apply a graduated ND filter to your landscape photos using GIMP (Part 9 of 14)

Sunday, April 3rd, 2011

Instead of paying to buy a graduated neutral density filter and go through the hassle of carrying it around and fitting and unfitting it everytime you use it, simulate the effect using layers and layer masks in GIMP.

When taking photos of sceneries where the bright sky occupies the upper half and the foreground occupies the lower half, it can be difficult to capture the entire range of brightness levels to show the details clearly.

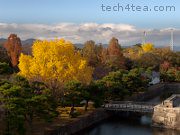
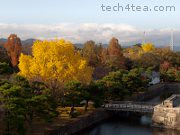
The park within the grounds of Nijojo Castle in Kyoto.

The park within the grounds of Nijojo Castle in Kyoto in autumn.

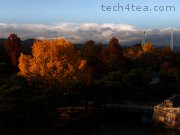
The sky has been darkened and the foreground lightened.

The sky has been darkened and the foreground lightened in GIMP.

The clouds and the sky can be too bright; while the mountains, trees and houses in the foreground may be too dark. This is made worse under the harsh sunlight of the midday sun when contrast in the photo will be at the highest.

The traditional way to get around this, is to avoid the midday sun, or to buy a graduated neutral density (ND) filter – if you own an SLR that allows filters to be attached to the lens.

The graduated ND filter darkens the upper portion of a photo so that the sky will not be overexposed while a brighter exposure can be used for the whole photo such that the foreground will not be too dark.

What if you use a compact camera, on which typically you can’t attach any filters? Or you find it a hassle to attach and unattach filters between snapshots? Or you simply don’t want to pay for another camera accessory that you have to carry around?

Using layers and layer masks in GIMP, you can pretty much simulate the effect of a graduated ND filter on the computer.

Simulate a graduated ND filter digitally using GIMP

I snapped the autumn colours of the park within Nijojo Castle in Kyoto from the top of the castle keep. The clear blue sky was rather bright while trees along the moat in the foreground of the photo were too dark.

Darkening the photo to darken the sky would make the foreground too dark. Brightening the photo to brighten up the foreground would overexpose the sky.

Duplicate two copies of the original photo in the Layers dialog.

Duplicate two copies of the original photo in the Layers dialog.

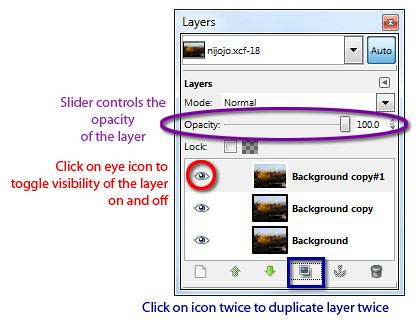
To control which areas to darken and brighten, first duplicate the original background layer twice by clicking twice on the Duplicate icon at the bottom of the Layers dialog.

Two new layers containing copies of the original photo are now created above the background layer. We will darken the upper copy and lighten the lower copy and then use a layer mask to merge the two layers so that only the darkened sky and the brightened foreground is visible.

Brightening the foreground

First hide the upper copy by clicking the eye icon to the left of its thumbnail in the Layers dialog.

Drag the middle slider directly below the histogram.

Drag the middle slider directly below the histogram.

Now click on the lower copy by clicking on it in the Layers dialog. Brighten the lower copy. You can use Colors > Brightness-Contrast I generally prefer the Colors > Levels command. I will cover this command in more detail later in the series.

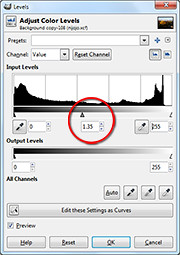
In the Levels dialog box that pops up, look below the Input Levels histogram and drag the middle slider to the left until the foreground is suitably lightened. You can see the entire photo lighten as you drag the slider.

Pay attention to the foreground and ignore the sky which will become excessively bright. You can see the numeric value of the middle slider in the centre text box just below the histogram. I used a setting of 1.35

Darkening the sky

Select the upper copy in the Layers dialog by clicking on it. Turn its visibility back on by clicking on the where eye icon previously was.

The lower duplicate copy is lightened with the Levels command.

The lower duplicate copy is lightened with the Levels command.

The upper duplicate copy is darkened to make the sky more dramatic.

The upper duplicate copy is darkened to make the sky more dramatic.

Darken this layer using the Colors > Levels command.

In the Levels dialog box that pops up, drag the middle slider to the right until the sky is suitably darkened. Again, pay attention to the sky and ignore the foreground which will become excessively dark. I used a setting of 0.45.

Blending the two copies using a layer mask

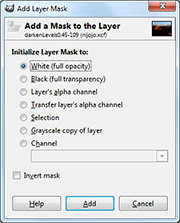
Select the White (full opacity) option.

Select the White (full opacity) option.

Right-click the upper copy and choose Add Layer Mask command from the pop-up menu. Click the radio button for “White (full opacity)” option and click on the Add button.

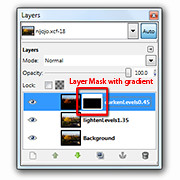
A layer mask is now added to the upper copy. In the Layers dialog, you can see the thumbnail for the layer mask to the right of the image thumbnail in the layer containing the upper copy.

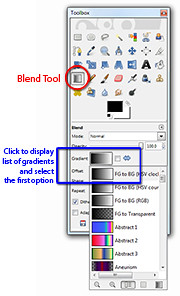
Activate the Blend Tool from the Toolbox. Reset the colour swatches in the Toolbox by pressing “D” on the keyboard. In the tool options below the Toolbox, make sure the “FG to BG” Gradient is selected.

Activate the Blend Tool from the Toolbox.

Activate the Blend Tool from the Toolbox.

Here’s the magic, click the cursor somewhere near the top of the yellow tree and drag the mouse vertically upwards until the cursor is just above the clouds in the sky before releasing the mouse button.

A black to white gradient is painted into the layer mask for the upper copy. The white parts represents the parts where the upper copy will be visible and the black areas represents the parts where the upper copy will be hidden. Grey areas represents areas where the upper copy is partially visible.

Where the upper copy is hidden or translucent, the lower copy will show through. The result is that the darkened sky of the upper copy will be visible while the lightened foreground of the lower copy will show through.

The layer mask shows the darkened sky and the lightened foreground.

The layer mask shows the darkened sky and the lightened foreground.

By painting in the layer mask with the Paintbrush Tool with black or white, you can further finetune exactly which parts of the darkened upper copy to remain visible and which parts of the lower lightened copy to show through.

You can further tweak the final result by adjusting the opacity of the two copies by dragging the layer opacity sliders for each of the layers. The layer opacity slider is found at the top of the Layers dialog.

You now have a pseudo-HDR (High Dynamic Range) photo which captures both the lightest tones in the sky and the darkest details in the foreground in a single photo.

Hiatus in the Intermediate GIMP Series this weekend

Saturday, March 26th, 2011
I’m dedicating this weekend to a photo tribute to Japan and a remembrance of the March 11 earthquake and tsunami.

The GIMP Intermediate Series takes a break today and tomorrow. The series will resume next weekend.

Local adjustments using Layer Masks in GIMP (Part 8 of 14)

Saturday, March 19th, 2011
Use a combination of layers and layer masks to make localised adjustments to specific parts of a photo. This installment shows how to use them to paint with light.

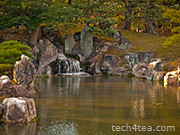
In the photo of the landscape waterfall, the rocks around the artificial waterfall are too dark because they are lying in the shadows of the surrounding trees. I want to lighten the rock features. Download the before photo and follow along.

This tranquil landscaped lake was shot in the Nijojo Castle in Kyoto, Japan.

This tranquil landscaped lake was shot in the Nijojo Castle in Kyoto, Japan.

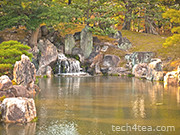
I want to lighten only the rocks around the waterfall without affecting the trees.

I want to lighten only the rocks around the waterfall without affecting the trees.

Creating a lighter duplicate layer

First duplicate the background layer by clicking on the fourth icon at the bottom of the Layers dialog.

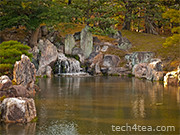
Lightening the rocks has lightened everything else as well, making the photo too harsh.

Lightening the rocks has lightened everything else as well, making the photo too harsh.

Brighten the duplicated copy by using Colors > Brightness-Contrast command from the main menu. You can see that in addition to the rocks, the other parts of the photo are lightened as well. That is the problem with global adjustments – when you lighten the shadows, the highlights get blown out.

For the moment, just concentrate on getting the brightness of the rocks right. Ignore what happens to the rest of the photo. I used a Brightness setting of 75 and Contrast setting of 45.

The duplicated layer has become lighter overall and more contrasty. It’s actually not bad overall but it gives the impression of a hot and harsh sunny day at the park. I prefer to convey the shadiness of the trees in the background and the tranquil ambience of the lake.

Adding a layer mask

Select the Black (full transparency) radio button.

Select the Black (full transparency) radio button.

Right-click on the name of the duplicated layer in the Layers dialog and select “Add Layer Mask” from the pop-up menu.

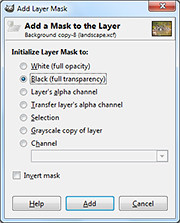
An “Add Layer Mask” dialog box pops up. Click the “Black (full transparency)” radio button and press the Add button.

In the image window, the duplicated layer disappears from view and you see the original darker photo in the Background layer.

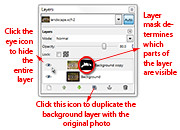
In the Layers dialog, note that in the duplicated layer,  a small rectangle thumbnail has been added to the right of the layers thumbnail. It is a mask that determines which part of the layer is visible.

A Layer Mask is added to the duplicated layer in the Layers dialog.

A Layer Mask is added to the duplicated layer in the Layers dialog.

Black areas in the mask make the corresponding areas in the layer transparent/invisible while white areas make the layer opaque/visible. Grey areas make the corresponding areas in the layer translucent or partially visible.

At the moment, the mask is totally black, so the entire layer is hidden from view.

Painting with light
Activate the Paintbrush Tool to paint on the Layer Mask for the duplicate layer.

Activate the Paintbrush Tool to paint on the Layer Mask for the duplicate layer.

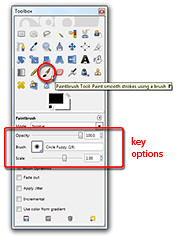
Select the Paintbrush Tool from the Toolbox. From the options below the Toolbox, select a Circle Fuzzy brush. Set the Foreground colour swatch to white. You can press “D” followed by “X” on the keyboard as a shortcut.

Now move the cursor over the rocks in the photo to be lightened and start painting. Because the layer mask is active, the painting actually occurs on the layer mask instead of the pixels in the layer.

And because the Foreground colour is white, painting on the layer mask reveals the corresponding pixels in the layer itself so that they become visible.

You can see the rocks lightening as you paint over them because pixels in the lightened layer is revealed as you paint white into the layer mask. You can also see the white areas appear in the layer mask thumbnail in the Layers dialog as you paint.

Adjust the size of the brush by pressing the “]” and “[” keys on the keyboard to increase or decrease respectively.

Painting back the mask

If you paint into the areas where you do not want to be lightened – like the leaves – and want to reverse the lightening, simply press “X” on the keyboard to toggle the Foreground colour to black. Painting on the layer mask now will hide the lighter pixels, so that the areas painted appears darker again.

If you find that painting on an area lightens or darkens it too much, lower the opacity of the Paintbrush Tool by dragging the Opacity slider in the Options below the Toolbox.

Alt-click on the Layer Mask thumbnail in the Layers dialog to show the mask in the image window.

Alt-click on the Layer Mask thumbnail in the Layers dialog to show the mask in the image window.

As you are painting, you can toggle the eye icon of the duplicated layer in the Layers dialog to compare how the photo looks before and after the adjustments. You can also disable the layer mask by Ctrl-clicking on it to see how the layer looks without the layer mask. Alt-clicking on the layer mask will show black-and-white layer mask in the image window itself.

Once you’ve completed the painting and lightened the rocks, you can still fine-tune the results by varying the layer opacity of the duplicated layer. Simply drag the Opacity slider near the top of the Layers dialog. This will reduce the overall intensity of all the lightening that you have done.

Maximum flexibility

This method of doing local adjustment provides plenty of control and flexibility. You don’t have to make a selection before making the adjustments. You can “paint” in the adjustments on the fly and reverse when you overdo an effect. You can tone down the opacity of the Paintbrush Tool to reduce the intensity and when the painting is completed, you can still control the overall intensity of the adjustments by varying the opacity of the duplicated layer.

What’s more, if you save the file in GIMP’s native .xcf file format, you can re-open the .xcf file at a later date and adjust the layer mask if you want change the adjustment.

Naturally, you can use this method for any type of adjustments – darkening, colour saturation, black and white toning etc. Just apply whatever effect you want to the duplicate layer and then use a layer mask to control how much of the effect shows through.

More about selection masks in GIMP (Part 7 of 14)

Sunday, March 13th, 2011

The ability to make selections in photo-editing software is one of the most important aspects of these software, because it allows the user to restrict adjustments to specific parts of a photo. Understanding how selections are represented in GIMP is essential to get the most out of GIMP.

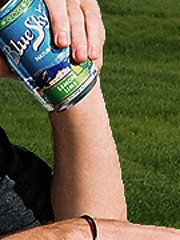
Yesterday, we selected a youth, his laptop and table using a quick mask and transferred him via copy-and-paste into another photo background.

Abrupt seam because of sharp edge of the selection.

Abrupt seam because of sharp selection edge.

More seamless transition with the new background.

More seamless transition with the new background.

You might have noticed, on close inspection, that the edges looked a bit abrupt and jarring against the new background, especially where the colour of the new background was very different from that in the original background.

To make the foreground objects gel more seamlessly with the new background, you can soften the transition between the foreground objects and the background.

Feathering the selection

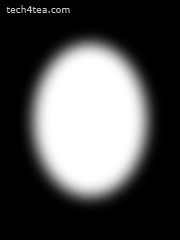
A large feather setting creates a vignette.

A large feather setting creates a vignette.

In normal selection mode, we can use the Select > Feather command to “feather” a selection before we do the copy-and-paste. This means that at the edge of the selection, the pixels go from fully visible inside the selection – to being translucent immediately on either side of the edge – to becoming totally invisible outside the selection.

How thick the translucent transition region is on either side of the selection edge depends on the feather setting used.

For yesterday’s example, the default feather amount of 5 pixels would have made the transition between the youth and the new background more natural and seamless. The transition also helps to mitigate imperfections when making the selection.

A large feather setting is used to create a vignette with a blurred edge.

Blurring a selection mask

The mask edge is sharp and abrupt.

The mask edge is sharp and abrupt.

Another way of feathering a selection edge is to apply a blur filter (Filters > Blur > Gaussian Blur at 1 to 2 pixels) to the selection mask while in Quick Mask mode. While in Quick Mask mode, the filter is applied to the mask instead of the image itself – so the mask is blurred.

We’ve seen that in Quick Mask mode, the areas with translucent pink overlay means that the pixels within are not selected, whereas the areas with no pink overlay means that the pixels inside are selected.

What if we paint some areas when the Foreground colour is set to gray? A lighter shade of translucent pink will be added as an overlay but this will be lighter than the pink added when the Foreground colour is set to black. In this case the pixels in those areas will only be partially selected.

The mask edge is blurred and smoothened.

The mask edge is blurred and smoothened.

Any effects/adjustments applied to pixels that are only partially selected will only be applied partially. For example, if a region in a photo is only 30% selected, and the selected area is subsequently darkened, those pixels will only be darkened up to 30% of whatever the darkening setting would have been.

Blurring the selection mask in Quick Mask mode will blur the edges pink selection mask, so that instead of an abrupt jump from fully masked to fully unmasked, a partially masked transition region is introduced. The partially masked transition region translates to a partially selected region.

Selection masks in photo-editing software

In fact, in GIMP and other photo-editing software, selections are represented as a grayscale image called a selection mask.

The white areas represent pixels that are fully selected, the black areas represent pixels that are totally not selected, while the gray areas represent pixels that are partially selected – with the darkness of the gray representing to what extent the pixel is partially selected (between 0 and 100%).

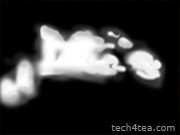
The selection mask is in grayscale.

The selection mask is in grayscale.

The Quick Mask shows which parts of a photo is selected.

The Quick Mask shows which parts of a photo is selected.

The pink overlay in Quick Mask mode is a means of showing the mask, while keeping the original photo visible at the same time, so that you can tell which parts of the photo is selected and to what extent.

Saving selections for future reuse or modification

As we saw in the photo of the youth, a selection can take a lot of time and effort to create. The selection is forgotten once we make another selection. What if we need to make the same selection in the future?

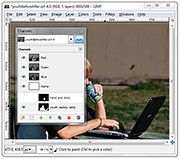
A selection can be saved as a channel in the Channels dialog for future use or manipulation. If the file is then saved in GIMP’s native .xcf format, the channel is saved as part of the file. And you can save many different selections as separate channels in the file.

Paint on the selection mask in the image window to modify it.

Paint on the selection mask in the image window to modify it.

To save a selection for future use, first make the selection, and then click the Select > Save to Channel command from the main menu. If you look in the Channels dialog, you will see a new channel at the bottom of the dialog. The selection has been saved as a grayscale selection mask in a new channel. Double-click on the name to rename it with something more meaningful.

To modify the selection, click the eye icon to display the selection mask. Click the channel containing the mask to select it.

Any changes or painting will now be applied to the mask rather than to the image. It’s like in Quick Mask mode, except the overlay is a translucent gray by default instead of pink. Paint on the mask (in the image window) with black, white or gray as the Foreground colour to modify the mask.

To get back to editing the photo instead of the mask, remember to hide the mask by clicking the eye icon against its channel in the Channels dialog. Then go to Layers dialog and select the layer that you want to edit.

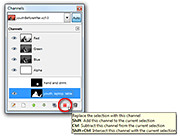
Click on the pink icon to load the mask as a selection.

Click on the pink icon to load the mask as a selection.

To load a selection, click on the selection’s channel in the Channels dialog to select it and click the pink icon to the bottom right of the Channels dialog. This will load the selection mask in that channel as a selection in the photo.
Entire books have been written just to explain how to create, manipulate and use selections, masks and channels. A good understanding of how selections, masks and channels work will open doors to harnessing GIMP’s full capabilities and start doing things that other simpler photo-editing software cannot do.