Following my 6-part series in Digital Life (The Straits Times) on basic photo-editing using GIMP, I received encouraging feedback and requests from readers and friends to cover more topics.
One of these was about the various ways of creating selections and vignettes in GIMP. A follow-up article was run on DL after the series. I cover these today and tomorrow for those who had missed it.
Selections for local adjustments
So far, most of the adjustments we’ve learnt have been applied to the entire photo. For example, removing a colour cast or darkening and overexposed snapshot. Such adjustments that are applied to the entire photo are known as “global adjustments”.
What if we want to adjust only a small portion of a photo? For instance, we want to lighten only the face of a person standing in the shadows. Lightening the entire photo just to lighten up one face in the shadows could lead to the faces of other people standing in the sun to become overly bright instead.
In these cases, select only the areas in the photo that needs to be adjusted. While those areas are selected, any adjustments applied will be limited to the pixels within those selections. Such adjustments where edits are done only on a specific part of a photo are called “local adjustments”.
As a workflow, global adjustments to the whole photo should be largely completed before commencing on local adjustments on specific areas of the photo.
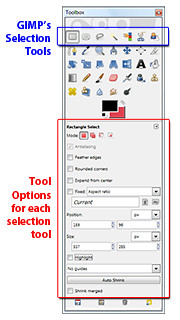
In GIMP, the tools for making selections are located right at the top of the Toolbox (see Picture 1 and the sidebar on “GIMP’s selection tool options”). Today we try out the most basic selection tool – the Rectangle Select Tool.
Rectangle Select Tool
With the Rectangle Select Tool, simply click in the photo and drag the cursor to form a rectangular selection.
You should see a moving black-and-white dashed line (resembling a single file of marching ants) marking the outline of the selection. The pixels inside the boundary are now selected and whatever adjustments applied will affect only the selected pixels.
Adjusting the selection boundary (and not the pixels inside)
After you have made the initial selection, you can resize the selection to select a bigger or smaller area.
Move the cursor near the sides or corners of the rectangular selection until the cursor turns into a white triangle. Drag the corner to resize the selection boundary.

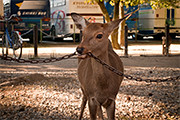
Pict 2: This demure deer was chewing on an iron chain for tea when I visited in Nara - Japan's ancient capital.
To move the entire selection boundary, move the cursor near the centre of the selection. When the cursor appears as two criss-crossing double-headed arrows, click and drag to move the selection boundary.
Once you have adjusted the selection boundary until it is where you want it to be and of the right size, you can edit the pixels within the selection.
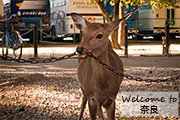
Pict 3: Captions on the photo is illegible unless its background is made lighter for more contrast against the dark text.
In Picture 2, I wanted to place a caption to label where the deer hails from. You can see that any text placed in the photo would be rather difficult to make out against the distracting background (see Picture 3).

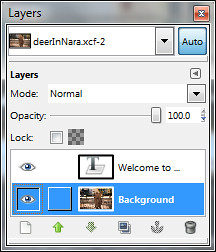
Pict 4: The captions reside in its own layer above the photo. Select the background layer first before increasing the brightness.
You can use the Text Tool to add captions. Any captions added will reside on its own layer above the background layer containing the photo.
Using the Rectangle Select Tool, I made a rectangular selection around the captions. Making sure the background layer with the photo (and not the text layer containing the caption) is selected (see Picture 4), I activated the Colors > Brightness-Contrast command from the main menu.
In the Brightness-Contrast dialog box, I increased the brightness of its the selected area in the photo by dragging the Brightness slider
At about 100, the dark caption became more legible (see Picture 5).
In the final episode of this series tomorrow, we’ll use the Ellipse Select Tool to create simple digital photo frames, as well as vignettes with blurred edges.
Tags: GIMP, image editor, photo editor, tips


Just tried out this text in a box effect for my powerpoint presentation this morning. Works perfectly!
Before this, I’d always either have to dim down the whole background picture or shrink the picture so that there’s blank space left to put the words. Otherwise, the text bulletpoints would not be very readable.
Now I can have full screen background photos and still have readable words on certain parts of the photos. Thks a million!
Glad you found the tutorial useful. Cheers!
[…] background with something refreshing. But his outline is highly irregular and complicated so the Rectangle and Ellipse Select Tools are out – unless he is a rectangular or oval […]