Archive for the ‘GIMP Basic Series’ Category

Use GIMP to create vignettes and digital photo frames (Final Part 14 of 14)

Friday, January 14th, 2011
Dog in a pram

Pict 1: This dog's eyes caught mine outside the Todaiji - a UNESCO World Heritage Site in Nara, Japan.

Create simple vignettes or digital photo frames for those special photos.

Yesterday, we used the rudimentary Rectangle Select Tool in GIMP to create a selection for making local adjustments to specific parts of a photo.

Today we check out the Ellipse Select Tool and use it to make simple vignettes and photo frames for digital photos.This is also the most common request that I receive from readers.

Ellipse Select Tool
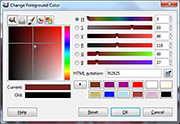
Selecting the foreground colour in GIMP

Pict 2: The same colour picker is used whenever selecting colour in GIMP.

The Ellipse Select Tool works in the same way as the Rectangle Select Tool.

In Picture 1 above, I want to add an oval photo frame around the dog. This will exclude the clutter and distractions in the vicinity of the dog and put the focus on the dog itself. Download the photo of the dog and follow along.

Since the photoframe around the dog will be an upright oval, crop the original photo from a broad landscape orientation to a tall portrait orientation.

Cropped photo of dog with oval mat

Pict 3: Crop the original photo and add the inner mat of the "photo frame" to exclude the distracting surroundings.

Using the Ellipse Select Tool, drag the cursor around the dog to form a tight oval selection around it (I have no idea whether it’s male or female). Now all the pixels inside the oval selection boundary is selected.

To create the inner mat for the photoframe, we want to fill the area OUTSIDE the oval with dark brown. Click on the Select > Invert command from the main menu to invert the selection. You can also press Ctrl-I on the keyboard as a shortcut. The area outside the original selection is now selected, while the original selection is now omitted.

Click on the foreground colour swatch in the Toolbox and select a dark brown colour from the “Change Foreground Color” dialog box that pops up (see Picture 2 above).

Dog in a "photo frame"

Pict 4: The dog is now in a simple "photo frame" with inner matting.

To select a colour, first click in the thin vertical strip of colour to pick the colour family. The big square colour swatch shows the different tones of the selected colour family. Click within this big square to select the foreground colour.

From the main menu, select the Edit > Fill with FG command to fill the mat with dark brown (see Picture 3).

If you simply want a simple oval photoframe, you can stop here and crop the photo closer to the oval frame.

For a photoframe with an inner mat, you need to add the outer frame. Repeat the above steps but make a slightly bigger oval selection and fill it with orange (see Picture 4). Don’t forget to press Ctrl-I to invert the selection before filling it with orange.

Vignette Effect
Dog in a vignette

Pict 5: The dog is now nicely vignetted.

A vignette is a frame with blurred edges, usually oval in shape – although you can ceate a vignette of any shape you want.

Activate the Ellipse Select Tool from the Toolbox. For a rectangular vignette, use the Rectangle Select Tool instead.

In the tool options below the Toolbox, click the “Feather edges” checkbox . A Radius slider appears that determines the thickness of the blurred region at the edge of the selection. Set the Radius setting to the maximum of 100.

Drag an oval selection around the subject. Press Ctrl-I to invert the selection and fill it with white or any colour you want. A quick shortcut to set the Foreground colour to white is to press “D” followed by “X” on the keyboard.
Selecting specific portions of a photo for editing (Part 13 of 14)

Thursday, January 13th, 2011
Selecting certain areas in a photo allows only those specific areas to be targeted for editing. Any adjustments and tweaks applied will be limited to only the pixels within those selections.

Following my 6-part series in Digital Life (The Straits Times)  on basic photo-editing using GIMP, I received encouraging feedback and requests from readers and friends to cover more topics.

One of these was about the various ways of creating selections and vignettes in GIMP. A follow-up article was run on DL after the series. I cover these today and tomorrow for those who had missed it.

Selections for local adjustments

So far, most of the adjustments we’ve learnt have been applied to the entire photo. For example, removing a colour cast or darkening and overexposed snapshot. Such adjustments that are applied to the entire photo are known as “global adjustments”.

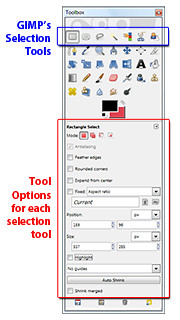
GIMP's selection tools and tool options

Pict 1: GIMP's selection tools are at the top of the Toolbox while the tool options are below.

What if we want to adjust only a small portion of a photo? For instance, we want to lighten only the face of a person standing in the shadows. Lightening the entire photo just to lighten up one face in the shadows could lead to the faces of other people standing in the sun to become overly bright instead.

In these cases, select only the areas in the photo that needs to be adjusted. While those areas are selected, any adjustments applied will be limited to the pixels within those selections. Such adjustments where edits are done only on a specific part of a photo are called “local adjustments”.

As a workflow, global adjustments to the whole photo should be largely completed before commencing on local adjustments on specific areas of the photo.

In GIMP, the tools for making selections are located right at the top of the Toolbox (see Picture 1 and the sidebar on “GIMP’s selection tool options”). Today we try out the most basic selection tool – the Rectangle Select Tool.

Rectangle Select Tool

With the Rectangle Select Tool, simply click in the photo and drag the cursor to form a rectangular selection.

You should see a moving black-and-white dashed line (resembling a single file of marching ants) marking the outline of the selection. The pixels inside the boundary are now selected and whatever adjustments applied will affect only the selected pixels.

Adjusting the selection boundary (and not the pixels inside)

After you have made the initial selection, you can resize the selection to select a bigger or smaller area.

Move the cursor near the sides or corners of the rectangular selection until the cursor turns into a white triangle. Drag the corner to resize the selection boundary.

Deer chewing on an iron chain

Pict 2: This demure deer was chewing on an iron chain for tea when I visited in Nara - Japan's ancient capital.

To move the entire selection boundary, move the cursor near the centre of the selection. When the cursor appears as two criss-crossing double-headed arrows, click and drag to move the selection boundary.

Once you have adjusted the selection boundary until it is where you want it to be and of the right size, you can edit the pixels within the selection.

Adjusting the selected pixels
Putting text captions on a photo

Pict 3: Captions on the photo is illegible unless its background is made lighter for more contrast against the dark text.

In Picture 2, I wanted to place a caption to label where the deer hails from. You can see that any text placed in the photo would be rather difficult to make out against the distracting background (see Picture 3).

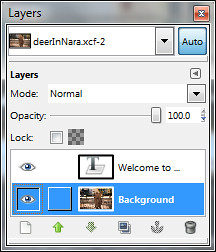
Layers dialog in GIMP

Pict 4: The captions reside in its own layer above the photo. Select the background layer first before increasing the brightness.

You can use the Text Tool to add captions. Any captions added will reside on its own layer above the background layer containing the photo.

Using the Rectangle Select Tool, I made a rectangular selection around the captions. Making sure the background layer with the photo (and not the text layer containing the caption) is selected (see Picture 4), I activated the Colors > Brightness-Contrast command from the main menu.

In the Brightness-Contrast dialog box, I increased the brightness of its the selected area in the photo by dragging the Brightness slider

Iron chewing deer with captions

Pict 5: This iron chewing deer awaits you should you visit the Deer Park in Nara.

At about 100, the dark caption became more legible (see Picture 5).

In the final episode of this series tomorrow, we’ll use the Ellipse Select Tool to create simple digital photo frames, as well as vignettes with blurred edges.

GIMP’s selection tool options

Thursday, January 13th, 2011
In GIMP, the tools for making selections are located right at the top of the Toolbox.

GIMP's selection tools and tool options

GIMP's selection tools are at the top of the Toolbox while the tool options are below.

The tool options below the Toolbox contains options that affect how the selection tools work, such as fuzzy edges and rounded corners for rectangular selections. It also displays the size and position of the selection in the photo.

The “Expand from center” checkbox allows the selection to be made by dragging from the centre of the rectangle or ellipse (instead of starting from a corner).

To make a selection of specific dimensions or aspect ratio, tick the “Fixed” checkbox. For instance, Type 1:1 in the text box to select a perfect square or circle.

To view the selected area better, click the “Highlight” checkbox so that the unselected areas are darkened slightly. The options in the guides dropdown box allows useful guides such as centre-lines, golden sections or the rule-of-thirds grid to be shown within the selection.

Digital makeover using GIMP (Part 12 of 14)

Wednesday, January 12th, 2011

Why stop at removing those red eyes. Use GIMP to remove moles, pimples, scars and wrinkles. Whiten the teeth and eyes, add a twinkle to the pupils and redden those lips. Finally top it off with the soft-focus glam effect from yesterday’s tutorial.

Portrait snapshot of a young lady

Pict 1: A typical portrait snapshot (in an office cubicle?). Photo from morguefile.com.

After a digital makeover

Pict 2: It doesn't take a lot of time to do a digital makeover in GIMP - and it's free!

Yesterday, we added a soft-focus effect to glam up portraits shots, today we go further to give the subject a digital makeover (see Pictures 1 and 2). Refer to previous tutorials for details how to execute some of the steps involved.

Exorcise red eyes

First select the iris of the red eye. Activate the Ellipse Select Tool from the Toolbox and drag diagonally from one side of the red area to the other. Activate the Filters > Enhance > Red Eye Removal command from the main menu.

A Red Eye Removal dialog box pops up with a Threshold slider to control how much of the red to remove. Usually the default value of 50 for the threshold slider is adequate for removing red eyes. Watch the thumbnail preview as you drag the slider to check that the red has been completely removed.

Note that if you forget to select the red eye first, the filter will remove any traces of red from the entire photo!

Remove moles/pimples/scars/wrinkles and hot spots from camera flash

Activate the Healing Tool from the Toolbox (click on the band-aid icon). Set the size of the brush such that it is slightly larger than the mole or pimple to be removed. Ctrl-click on a clear patch of skin to designate that as the clone source from which to copy pixels.

Click on the mole/pimple. GIMP copies pixels from the clone source but blends the new pixels into the surrounding pixels seamlessly.

For wrinkles and scars, paint along the wrinkles or scars to replace them with smooth skin from the clone source.

Use the same techniques to replace hot spots on the skin resulting from reflections from camera flash.

Whiten teeth and eyes

To remove yellowish/brownish tints from the teeth, activate the Paintbrush Tool from the Toolbox. Press “D” on the keyboard to reset the foreground and background colours to black and white. In the Tool Options, set the mode to Saturation.

Select a Circle Fuzzy brush and set the size of the brush such that it is smaller than the height of the teeth. Dragging the Opacity slider to reduce the opacity of the brush to 50. Paint over the teeth to remove any yellowish/brownish tints from the teeth. Be careful not to remove the colour from the pink gums.

To brighten up the teeth, activate the Dodge/Burn Tool from the Toolbox. Select the Dodge radio button in the Tool Options and then paint over the teeth to brighten them.

To whiten the white parts of the eyes, simply repeat the above steps.

Lipstick magic (see Pictures 3 to 5)

To darken the colour of the lips, use the Dodge/Burn Tool from the Toolbox. Select the Burn radio button in the Tool Options and then paint over the lips to darken them.

Instead of darkening the lips, you can intensify the colour of the lips by increasing the saturation of the lip colours.

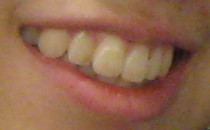
Lips and teeth before makeover

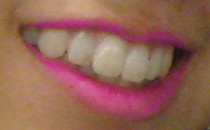
Pict 3: Before the makeover, the lips are pale while the teeth are off-white, as do all of us mortals.

Activate the Paintbrush Tool from the Tool box and set the Mode to Saturation. Click on the Foreground colour swatch in the Toolbox. In the Change Foreground Color dialog box that pops up, click the top right corner of the large square colour palette to choose any bright saturated colour and press OK.

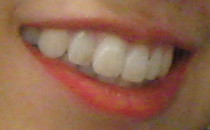
Lips reddened and teeth whitened

Pict 4: The teeth have been whitened and the lips reddened after the makeover.

Set the opacity to 50 and a brush size that is smaller than the thickness of the lips. Paint on the lips to saturate the lip colour. Avoid painting over the white teeth otherwise the brush will add a garish colour to the teeth.

Lipstick colour changed to mauve

Pict 5: Feeling whimsical? Change the lipstick colour to an entirely different colour!

If you’re feeling whimsical, change the colour of the lipstick altogether. Create a new empty layer by choosing Layer > New Layer. Change the Layer Mode of the new layer to “Color”. Activate the Paintbrush Tool from the Toolbox.

Click on the Foreground colour swatch and select a new lipstick colour. Paint over the lips. To reduce the intensity of the new “lipstick”, drag the Opacity slider in the Layers dialog to reduce the opacity of the layer.

Twinkle in the eyes

The eyes are the windows to our soul. To add that twinkle to the pupils, select the Paintbrush Tool from the Toolbox. Set white as the foreground colour by pressing the letter “D” followed by “X” on the keyboard. Click inside the pupils to add the catch-lights.

Apply soft focus

To add to the cream to the cake, apply a soft focus effect to the photo. Refer to the steps described in yesterday’s tutorial (see Pictures 6 and 7).

Portrait snapshot of a young lady

Pict 1: Here's the "Before" shot prior to the makeover.

Glam soft focus effect added to the makeover

Pict 7: Apply a soft focus effect to glam up the final makeover.

Tomorrow, we’ll look at how to make selections to limit adjustments to specific areas of the photos.

Soft-focus glamourous celebrity portraits using GIMP (Part 11 of 14)

Tuesday, January 11th, 2011
Want to emulate those soft-focus glamourous portraits of Hollywood celebrities? Do it easily with GIMP.
Yesterday, we enhanced digital photos by sharpening them before printout. Today, we do the opposite and introduce a soft-focus effect on portraits to glam up even the most mundane snapshots.

For photos with people in them – especially those with close-up shots – sharpening can emphasize the texture and blemishes on the skin and face. Instead, try simulating a soft focus effect.

Portrait of young lady

Pict 1: This photo of a beautiful young lady is from morguefile.com.

Soft focus effect for the photo

Pict 2: The soft focus effect was added in less than a minute to glam up the shot.

The hazy effect smoothens out skin complexion and lends a dreamy and glamourous touch to portraits (see Pictures 1 and 2).

To achieve this effect, photographers in the past used to attach special lens filters or even fit stockings over the camera lens. You can, however, emulate this effect easily in GIMP.

Duplicate the background layer

In GIMP, duplicate a copy of the photo by selecting Layer > Duplicate Layer command from the main menu. Change the Layer Mode for the duplicated layer to “Screen”. You can do this by clicking the dropdown box at the top of the Layers dialog and selecting Screen from the list. The photo is brightened up but still in sharp focus.

Layers dialog showing the pertinent settings

Pict 3: Duplicate the photo, blur it and set the Layer Mode to "Screen".

The duplicate copy sits above the original photo (see Picture 3). Apply Filters > Blur > Gaussian Blur command to the duplicate copy. Start with the default setting of five and press OK. Don’t worry if the preview thumbnail shows the image in the duplicated copy to be excessively blurred (see Picture 4). The combination of the two layers via the screen layer mode results in a dreamy glow to the photo.

If the effect is not strong enough, apply the Gaussian Blur filter a second time to the duplicated layer. If the effect is way too strong, press Ctrl-Z to undo and then reapply the filter with a smaller setting.

To finetune and reduce the intensity of the effect, reduce the opacity of the duplicated layer. Simply drag the Opacity slider at the top of the Layers dialog. I usually use an opacity of between 60 and 80.

Gaussian Blur dialog box in GIMP

Pict 4: Apply the Gaussian Blur filter on the duplicate layer.

This effect can also be applied to non-portrait photos to add a dreamy atmosphere to the photo.

Adding a sharpened layer

Layers dialog showing the sharpened duplicate layer

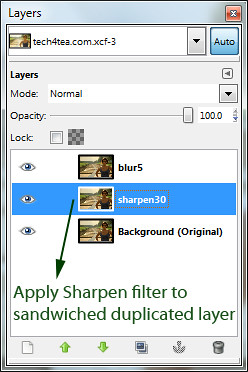
Pict 5: The sharpened duplicate layer should be just above the background layer.

If the features of the portrait (such as the eyes or the lips) becomes too blurred as a result of the effect, duplicate an additional copy of the original photo in the background layer. Select the background layer before activating the Layer > Duplicate Layer command from the main menu

Apply the Filters > Enhance > Sharpen filter to this new duplicate copy. This layer should sit above the background layer but below the other layers created earlier (see Picture 5).

The sharpened layer will add back some sharpness to the edges in the final outcome.

Tomorrow, we’ll use GIMP give portraits a digital makeover.

Sharpening and softening your photos with GIMP (Part 10 of 14)

Monday, January 10th, 2011
Digital photos are inherently not as sharp as their film predecessors because of the physics of the camera sensor. Use GIMP to sharpen your snapshots before sending them for printout.

Yesterday, we removed unwanted objects from photos by cloning neighbouring pixels and painting them over the objects. Today we use GIMP to sharpen digital snapshots.

Digital photos tend to appear not as sharp as their film predecessors because of the way digital cameras interpret the information from the camera sensor. This is made worse when printing out the photos because of the way ink spreads on the printing paper.

Gourdes - a hillclad village in Provence, France

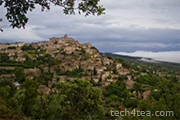
Pict 1: This precarious hillclad village is slightly out of focus because the camera had focussed on the overhanging branches instead.
Sharpened photo of Gourdes

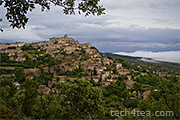
Pict 2: A bit of sharpening can make a big difference when the photo is printed out. Gourdes is one of my favourite villages in Provence, France.
Sharpening digital photos using an image editor on a computer is simple but can make a photo appear more crisp and appealing (see Pictures 1 and 2). In fact, I usually keep the sharpening setting in my camera and photo scanners to the minimum because a dedicated photo editor on the computer can usually do a better job at sharpening photos.

Quick and simple sharpening

The "Sharpen" dialog box in GIMP

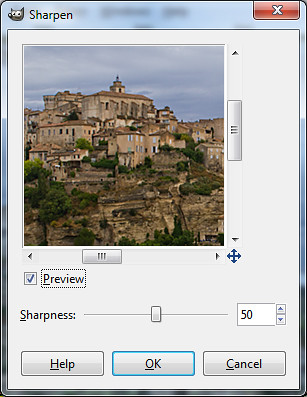
Pict 3: A "Sharpness" setting of between 10 and 50 is usually adequate.

Sharpening a snapshot in GIMP is quick and easy: simply select the Filters > Enhance > Sharpen command from the main menu. A “Sharpen” dialog box pops up (see Picture 3) showing a single “Sharpness” slider to control the amount of sharpening to be applied, and a thumbnail to preview the effect visually. Enlarge the dialog box to make the preview thumbnail bigger.

Colour pencil sketch-like effect of Gourdes

Pict 4: Deliberately pushing the "Sharpness" slider near the maximum can produce a neat colour pencil sketch like effect.

Avoid setting the sharpness amount too high, since this will also sharpen the undesirable noise and grain in the photo and make the photo look garish.

However, for those looking to turn their photos into a colour-pencil-sketch like effect, try pushing the sharpness slider near the maximum value of 99 (see Picture 4).

Exercising more control over the sharpening

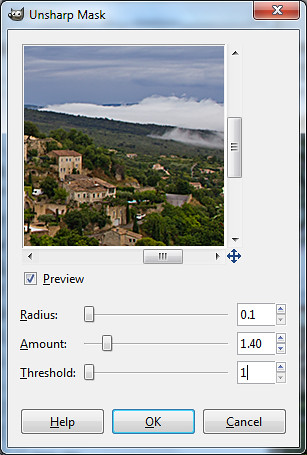
If you have the time and desire more control over how the sharpening effect should look, go straight to the Filters > Enhance > Unsharp Mask command instead (see Pictures 5).

Unsharp Mask dialog box in GIMP

Pict 5: The Unsharp Mask filter provides more control over how the sharpening is accomplished.

The Unsharp Mask filter actually sharpens a photo – contrary to what its name suggests – and is the tool of choice of the pros. The name and method used is based on a traditional darkroom technique for sharpening film photos – in which a photo is made to appear sharper by superimposing a blurred copy of the photo over the original photo.

Similar to the simple Sharpen filter, an “Unsharp Mask” dialog box pops up with a preview thumbnail of the sharpening effect. There are, however, three sliders, providing finer control over how the photo is sharpened.

GIMP first detects the edges in the photo and sharpens the photo by increasing the contrast of these edges. It lightens the lighter pixels on one side of an edge and darkens the darker pixels on the other side, making the photo appear more crisp than it really is.

The Amount slider controls the strength of sharpening to apply while the Radius slider specifies how many pixels on either side of an edge will be modified for sharpening.

The Threshold slider tells GIMP how it should detect edges. Only adjacent pixels where the difference in pixel values exceeds the Threshold value will be detected as part of an edge to be sharpened. A high Threshold value protects areas of smooth tonal transition from being sharpened, and minimises the amplification of blemishes in faces, water surfaces or skies.

Painterly version of Gourdes

Pict 6: Pushing the "Radius" and "Amount" up can lead to some nice painterly effects.

Although the Unsharp Mask filter avoids accentuating the noise and graininess in the photo, oversharpening will introduce halos around the edges in the photo and make it look unnatural. Details in the photo are also lost because the highlights are blown out into pure white while shadows are muted into black.

Again, don’t oversharpen unless your intent is to deliberately create a painterly special-effects version of the photo (see Picture 6).

Tomorrow, we’ll use GIMP to give portraits a soft focus reminiscent of glamorous celebrity shots.

Cloning out distractions using GIMP (Part 9 of 14)

Sunday, January 9th, 2011

Are lamposts sticking out of your head in a photo – or are tree branches growing out of the ears instead? Remove them using the Clone Tool in GIMP.

Yesterday, we looked at some camera settings that will help get from the camera the best quality photo for GIMP to work on. Today we return to GIMP to remove unwanted objects like overhead cables and background dustbins from a snapshot.

Mt Fuji with cables stretching across it

Pict 1: Clear vista of Mt Fuji (apart from those cables) from across Yamaguchi train station on a bright sunny day.

A common advice for photographers is to look out for objects sticking out from a subject’s head or ears when framing the shot. And then reposition the subject to avoid these shot-spoliers.

However, sometimes the space and angle available might make it impossible to do so. Other times, the photographer is so focused on the main subject that he doesn’t notice the lamp-post or tree branch in the background, or that bright green dirty dustbin to the side.

View of Mt Fuji with cables "removed"

Pict 2: The cables have been "removed" by copying neighbouring pixels over the cables.

I took the photo of Mt Fuji on a sunny day in early autumn. The view of the mountain was perfect apart from those darn electric cables stretching right across the frame. I wanted to include the train rolling into the train station at the small lake-town of Yamaguchi, as well as buildings at the foothills of Fujisan.

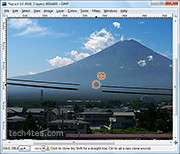
Let’s use the Clone Tool in GIMP to remove those cables (see Pictures 1 and 2).

Selecting the Clone Tool

Icon for the Clone Tool in GIMP's Toolbox

Pict 3: Select the Clone Tool by clicking on its icon in GIMP's Toolbox

The Clone Tool allows you to paint over the cables by copying pixels from other parts of the photo. Select the Clone Tool from the Toolbox (see Picture 3).

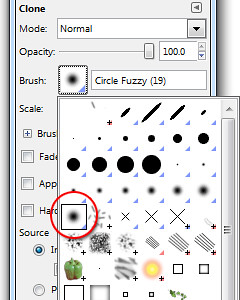
In the tool options in the lower half of the Toolbox, select the “Fuzzy Circle” brush. You can do this by clicking on the square icon beside the Brush label, and selecting, from the drop-down panel of brush shapes, the circular brush with blurred edges (see Picture 4).

Choose the "Fuzzy Circle" brush from the dropdown panel

Pict 4: Choose the "Fuzzy Circle" brush from the dropdown panel in the tool options below the Toolbox

Drag the “Scale” slider in the tool options to control the size of the brush, or simply press the straight bracket keys on the keyboard – “]” to increase the brush size and “[“ to decrease. The cursor shows how big the brush is.

Cloning over the cables

To remove the cables near the centre of the Fuji photo, first designate the area from which to copy pixels from.

Hold down the Ctrl key and click on an area close to where you want to start painting over the cable. A circle with a cross-hair is displayed to indicate where this clone source is.

Cloning out the cables

Pict 5: After designating the clone source, paint over the cables to copy pixels from the clone source.

Drag the cursor over the cable to paint over it (see Picture 5). As you paint over the cable, the clone source will also move such that it maintains its relative position to the cursor. If you make a mistake, press Ctrl-Z to undo and try again.

Change the clone source as you paint on different parts of the cables because the background behind the cable changes over the stretch of the cables.

Using a blurred edge for the brush helps merge the copied pixels seamlessly with the cable’s background. To make the merging even more seamless, reduce the opacity of the brush (drag the slider in the tool options) and paint a few times over each stretch of the cable.

Zoom in for the details

To work on areas where there are intricate details in the background behind the cables, get a bigger and clearer view by pressing the “+” key on the keyboard to zoom into the photo. For example, where the cables cross some pylons in the foothills and where the background of the cables change from sky to mountain.

Because of the clear edges involved, click the checkbox for “Hard edge” in the tool options. This allows parts of the pylon and the edge between the mountain and the sky to be copied crisply over the cables.

Reduce the size of the brush for more precision and use Ctrl-Z to undo mistakes. With some practice, you should get the hang of it quickly enough.

Cropping out the foreground

As you can see, cloning can be time consuming and straining to the eyes. If the unwanted objects or blemishes are around the edges of the photo, it is easier to just crop them out using the crop tool.

Final cropped photo of Mt Fuji

Pict 6: Cropping out the car park and other wires in the foreground also framed the photo more tightly drawing the focus to the mountain itself.

In the photo of Mt Fuji, I removed the car park and other wires in the foreground simply by cropping them out (see Picture 6).

Apart from unwanted objects in the photo, the Clone Tool can also be used to remove dark blotches in the photo arising dust or dirt spots on the lens or camera sensor.

Tomorrow, we’ll use GIMP to sharpen photos before sending them for printout.

Basic camera settings (Part 8 of 14)

Saturday, January 8th, 2011

Let’s go back to basics and see what settings on the digital camera will produce as good a photo as possible for GIMP to start working with.

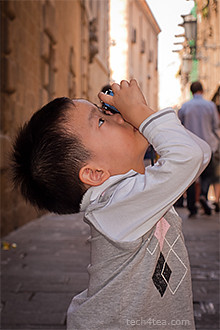
Boy pointing a camera upwards

New to digital cameras? Here are some basic settings to get the most out of your camera.

Yesterday, we used GIMP to turn a colour photo into black-and-white, and tinted it with another colour like sepia. Today, we give GIMP a break and go back to basics. I’ll share what camera presets to use in the digital camera to get the best quality photo from the camera – for GIMP to work on.

Having seen what photo-editors like GIMP can do to correct photographic mistakes and enhance snapshots, one may to tempted to become slipshod when taking photos.

After all, GIMP can straighten a crooked photo, crop a poor composition, remove unpleasant colour casts, and darken or brighten an overexposed or underexposed photo.

Later on in the series, we’ll see GIMP sharpening slightly blurred photos and removing lampposts sprouting from the top of people’s heads.

What a photo-editor CANNOT do

However, there IS a limit to what photo-editors can do. As they say, “Garbage in – Garbage out”.

Photo of Shinto temple with areas highlighted

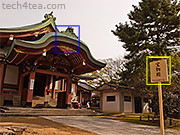
Pict 2: Le'ts examine areas of this photo taken at the Kitano Tenmangu temple in Kyoto.

Even the best photo-editor cannot add in lost details from an overly blurred snapshot, or bring back image quality destroyed by an overly high JPEG compression. The JPEG compression throws image detail away and introduces unsightly colour blobs called image artifacts into the photo.

Neither can GIMP bring back details that were not captured in an overly overexposed or underexposed photo – such as the backlit silhouette of a person against a bright background.

It is also difficult to remove colour noise introduced by a high ISO setting.

Here are some basic camera settings I propound whenever somebody asks me what settings to use for their new digital camera. If you already know these stuff – please bear with me.

Use the maximum camera resolution

Digital cameras allow photos to be taken at lower resolutions. For example, you can set a 12 megapixel camera to capture photos at eight, three or fewer megapixels. This is for photographers who simply want to send the photo via email or share it online and want to upload the photo fast, or who are running out of space on their memory cards.

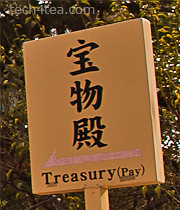
Enlarged view of signboard at high resolution

Pict 3: Using the maximum resolution means that even if you crop a small portion of the photo or enlarges it, there are enough pixels for a sharp print.

Enlarged view of signboard at high resolution

Pict 4: Taken at smaller sizes, enlarging the photo or cropping a small portion of the photo can lead to poor quality due to pixellation.

Unfortunately, the camera simply throws away image pixels and under-utilises the high resolution camera sensor that you paid your moolah for.If you want a good quality print to hang on the wall, use the maximum resolution of the camera. This gives GIMP more pixels to work with when tweaking the photo later on and a sharper photo if the print size is big.

It also allows you to crop a small portion of the photo and still have enough pixels for a good print. Should you need to email or share a photo online, you can still resize the photo to a lower resolution using GIMP.

Use the best quality setting

Most digital cameras store photos as JPEG files. You can specify how much compression to use. High compression results in smaller files but also means poor quality.

Enlarged view of roof at low JPEG compression and good quality

Pict 5: Using a low JPEG compression takes up more memory space but results in good image quality.

Enlarged view of roof at low JPEG compression and good quality

Pict 6: Using a high JPEG compression takes up less memory space but results in poor image quality.

Always choose the best quality setting so that a low compression level is used. After all, memory cards are cheap nowadays. There is no point forking out so much money for the camera and the vacation only to have the photos spoiled by a high JPEG compression setting.

Turn digital zooming off

Many digital cameras boast the “digital zoom” feature. Disable this feature. During digital zooming, the camera adds image pixels to the photo to make it appear bigger. This reduces the sharpness and quality of the photo.

If the subject really needs to be magnified, use GIMP to upsize the photo. A photo-editor on a computer can do a much better job than the data processor on board the camera.

Low light photography

Low light photography can produce some of the most challenging snapshots to correct. A high ISO introduces colour noise that is difficult to remove even in a photo-editor. A long exposure results in blurring due to camera shake. While the use of flash can result in harsh hotspots from reflections off oily skin.

For still subjects in low light, use a tripod along with a long exposure and low ISO. The low ISO minimises noise and the tripod removes blurring due to camera shake. The long exposure can result in some grainy noise but it’s not as bad as that introduced by a high ISO setting. However, if the subject is moving, the long exposure will result in motion blur.

Tomorrow, we’ll go back to using GIMP to remove overhead cables, branches sprouting from people’s ears and dustbins in the background.

Black-and-white and Sepia (Part 7 of 14)

Friday, January 7th, 2011

Want to turn a colour photo into an artsy black-and-white? Or add a touch of nostalgia by turning it sepia? Or simply add any colour tint if you’re feeling flamboyant.

Yesterday, we removed undesirable colour casts using GIMP. Today let’s drain colour totally from the photo – and then put back some.

Draining out the colour

Using the Colors > Desaturate command

Colour photo of kids going to school in Japan

Pict 1: These kids were on their way to school at seven in the morning, at morbidly cold temperatures.

Black-and-white photos can convey the mood of a scene better than colour, sometimes turning a mundane colour photo into something dramatic.

If the background is colourful and distracting, turning the snapshot to black-and-white can help to mitigate the distraction from say a bright red car, shirt or signboard in the background and make the main subject stand out.

Black-and-white photo of the kids going to school

Pict 2: Converting the photo to black and white was more congruent with the traditional houses in this carefully preserved Edo-era Japanese village called Tsumago.

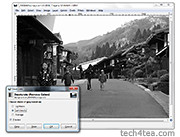
The simplest way to turn a colour photo into black-and-white is to select the Colors > Desaturate command from the main menu. The result may be a bit flat and dull but it’s quick.

A simple dialog box appears with three different methods of producing black-and-white versions of the photo. The methods are based on the Lightness, Luminosity and Average values of the pixels in the colour original (see Picture 2).

The results are slightly different from each other so click in turn on the radio button for each method to see a preview of the effect on the photo. Click OK to apply the conversion.

Using the Colors > Components > Channel Mixer command.

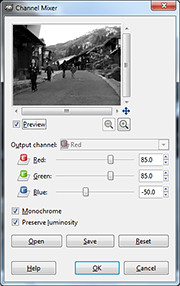
For more control over how the converted black-and-white photo looks, use the Colors > Components > Channel Mixer command instead.

Channel Mixer dialog box in GIMP

Pict 3: Drag the sliders in the Channel Mixer dialog box to control how the final black and white version will look.

In the Channel Mixer dialog box that pops up, check the “Monochrome” and “Preserve luminosity” checkboxes. Adjust the three sliders to control the resulting black-and-white effect (see Picture 3).

Black-and-white conversion using Channel Mixer

Pict 4: Using Channel Mixer allowed fine control over how the black-and-white conversion is done and can yield punchier results.

Unfortunately, the preview on the black-and-white effect is not available in the photo itself – it is only available in a small thumbnail inside the dialog box. You can enlarge the thumbnail preview by enlarging the dialog box itself, by dragging one of its corners outwards.

Press OK to apply the conversion (see Picture 4).

Tinting the photo with colour

To add a touch of nostalgia to a photo, tint it with a touch of sepia. Apply the Colors > Colorize command from the main menu.

Sepia version of the photo

Pict 5: Add a touch of nostalgia by tinting the photo sepia.

A Colorize dialog box appears with three sliders. Drag the Saturation slider down to 25 to reduce the intensity of the tint. For a sepia tint, drag the Hue slider to 45. Finally, adjust the Lightness slider to taste before pressing the OK button (see Picture 5).

To tint the photo with colours other than sepia, varying the Hue slider in the Colorize dialog box (see Picture 6).

Cyan-tinted version of the photo

Pict 6: Feeling flamboyant? Tint the photo with any colour that strikes your fancy.

When applying the Colorize command directly on a colour photo, GIMP first converts the photo into black-and-white internally using the Desaturate command, before adding the colour tint. The result can be rather flat at times.

I prefer to convert the colour photo into black-and-white first using the Channel Mixer command – so that I can control which tones (skin tones, for instance) to stand out in the final photo.

Tomorrow, I’ll go back to basics and share what camera presets to use in the digital camera to get the best quality photo from the camera – for GIMP to work on.

Removing colour casts with GIMP (Part 6 of 14)

Thursday, January 6th, 2011

Have you ever shot photos where the women look like they’re from Venus or the men look like they’re from Mars? Wrong white balance settings on the camera can lead to colour casts that coat everything in the photo with a hideous tinge. Use GIMP to remove these undesirable colour casts.

Yesterday, we used Layers and Layer Modes to tweak the brightness and contrast of photots. Today, we remove (or add) colour casts using GIMP.

Colour casts in photos are caused by the surrounding light at the time the shot was taken. Some casts makes a photo look nicer while others add ugly tints that make people in those photos look like the Na’vi from Pandora.

Golden sunset along the coast of Lake Biwa

Pict 1: This stunning golden sunset was taken off the coast of Lake Biwa from the top of Hikone Castle in Japan.

Orange colour cast removed from sunset photo

Pict 2: The orange colour cast has been removed to restore the "original" colours - but the sunset has lost its soul.

The rich, golden colours during sunrise and sunset are examples of colour casts that enhances a photo (see Pictures 1 and 2). Fluorescent lights, however, are notorious for adding hideous blue or green colour casts onto a scene.

White Balance setting on cameras

Before snapping a photo, set the camera’s White Balance setting to Auto (see Picture 3). Under most lighting conditions, the camera will automatically detect and remove colour casts from the photo.

Setting the white balance on the camera

Pict 3: Set the White Balance on the camera to Auto

To help the camera better judge the compensation needed, a photographer can change the camera’s White Balance setting from Auto to Sunlight, Cloudy or Fluorescent, for example, depending on the ambient lighting.

Be careful though – a common reason for unwanted colour casts in photos is when the white balance has been set wrongly. For example, you may have just shot outdoors in the sun using the “Daylight” white balance setting, and then move indoors to shoot under fluorescent lighting. If you forget to switch the white balance setting in the camera from “Daylight” to “Fluorescent”, the indoor shots will turn out with a strong blue or green tint.

Removing colour casts

In GIMP, apply Colors > Auto > White Balance from the main menu. This should automatically remove colour casts from most photos. Usually, the brightness and contrast are enhanced as well. To make the colours look richer, apply Colors > Auto > Color Enhance to make the colours more saturated.

Color Balance dialog box in GIMP

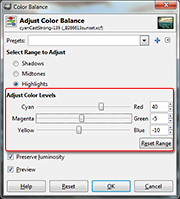
Pict 4: Adjust the three sliders in the Color Balance dialog box until the colour cast has been eliminated.

If the above auto-adjustments do not remove colour casts completely, try doing it manually using Colors > Color Balance instead. The Color Balance dialog box pops up containing three sliders for controlling colour in the photo (see Picture 4).

The three sliders comprises pairs of colours on opposite ends of each slider. Moving a slider towards the colour on one end will increase the intensity of that colour in the photo and reduce the intensity of the colour on the other end of the slider.

For example, if there is a cyan colour cast in the photo, drag the cyan-red slider towards the red end to reduce cyan in the photo and make the photo look redder.

Above the sliders, there is a group of three radio buttons to specify whether the colour adjustments are applied to the Shadows, Midtones or the Highlights. Start with the Highlights before moving on to the other two ranges.

Cyan colour cast in sunset photo

Pict 5: A beautiful sunset off the coast of Lake Biwa is marred by a cyan cast.

Sunset photo with cyan colour cast removed

Pict 6: The cyan colour cast has been removed but the sunset still looks flat.

To preview the effects of the adjustments on the photo, leave the Preview checkbox at the bottom of the dialog box ticked. Adjust the three sliders until you feel the colour cast has been removed (See Pictures 5 and 6).
Red and yellow cast deliberately added to photo

Pict 7: A red and yellow colour cast has been deliberately added to better convey the original warmth and glow of the sunset.

You can even add your own colour casts deliberately to add some atmosphere to the photo (see Picture 7).To compare the photo before and after the adjustments, toggle the Preview checkbox on and off.

At the bottom of the dialog box, there are three buttons to either Reset the sliders, Cancel the adjustments, or press OK to apply the adjustments.

Tomorrow, we’ll look at how to remove colour totally to turn photos into black and white, tint them a nostalgic sepia, or any other colour that strikes your fancy.