Adobe launches PDF Guild.

March 8th, 2011

In a bid to drum up interest in a staid workhorse product, and get consumers to look beyond its ubiquitous role as a document reader, Adobe has embarked upon an innovative campaign to convince people that Acrobat X is more than just a reader, or a document archiver.

Acrobat X contains a complete suite of modules to facilitate “sharing and collaboration of digital documents amongst co-worders”.

What is Acrobat?

To the man in the street, Acrobat brings immediately to mind Acrobat Reader, the ubiquitous free browser plug-in that enables the opening and viewing of documents saved in the equally ubiquitous PDF format.

Nothing exciting. In fact, many third party software publishe PDF reading software that promises to be smaller and faster than the original.

The other half of Acrobat comprises other modules that facilitate document archival via conversion of documents from proprietary formats to the universal PDF format. It enhances document collaboration by tracking and managing comments and amendments that co-workers can add – even simultaneously – and then reconcile into a neatly compiled working document.

Have you tried circulating minutes to members of a meeting and manually compiling spurious comments that come in from those members suggesting amendments? An Acrobat-based workflow can alleviate much of those grunt work and save everybody’s time and effort.

The price of such rigorous sharing is security, and this is implemented via document encryption and password-based access and rights.

Another form of document collaboration involves the interaction between the publishers and readers, and this is managed by the form authoring and editing module in Acrobat.

As for content, in addition to just plain text documents, Acrobat can add sound, video and graphics to the text. The latest PDF Portfolio module assembles the source files of multi-media elements together into a single multi-document portfolio packaged in slick Flash-based presentations (Unfortunately, there’s no HTML5 versions available – pity!).

Users don’t have to track multiple files manually to put them together outside of Acrobat.

Adobe PDF Guild

No wonder the folks at Adobe believe they have a product that does magic. They are aware, however, that general awareness of Acrobat’s full capabilities beyond that of the Reader is sorely lacking.

That’s why Adobe has launched the PDF Guild. Based on a metaphor of magic and wizardry, the PDF Guild seeks to build a community of Acrobat users that shares the knowledge and expertise of its members in the software rigorously with each other.

For starters, Adobe has built a simple self-paced computer-based learning package in the guise of a simple RPG (role-playing game) “adventure” to entice people to try out Acrobat and experience for themselves how easy to accomplish the tasks that Acrobat boasts it can achieve.

Five “quests” challenge the curious who signs up to complete assignments and quiz questions on “Document Conversion”, “Document Collaboration”, “Document Security”, “Dynamic Forms” and “Rich Documents”.

I’ve cleared all five quests and found that the hands-on experience did provide a clearer understanding how to do stuff in Acrobat.

To participate, visit www.adobepdfguild.com. Participants who don’t yet own a copy of Acrobat X can download and install a 30-day trial version. You’ll need a Facebook account too to participate.

Everything you need to complete the assigned tasks are provided, right down to working documents that you can download, work with in Acrobat and then save. The result is than uploaded from within www.adobepdfguild.com. Stumped along the way? Hints are available to make the road a little less difficult.

The magic? You start out as an the sorcerer’s apprentice and as you accomplish points, you get promoted to high ranks of wizardry, like Sorcerer, Mage and ultimately Wizard.

Goodies? The points earned can be used to redeem stuff from Adobe, from notepads and thumbdrives to free copies of Adobe Photoshop Elements 9 and Adobe Premiere Elements 9. Additional ways of earning points include introducing friends via email or Facebook, and participating in discussions at the Guild’s Facebook page.

Olympus announces 3 new digital compact cameras.

March 7th, 2011
Olympus has unveiled 3 new digital compacts. This continues its 2011 trend of releasing new cameras at the beginning of every month.
16M backlit CMOS, 12.5x, 24 - 300 mm

Olympus SZ-20

altText

Olympus SZ-30MR

14M CCD, 5x, 28 - 140 mm

Olympus TG-810


Having launched seven cameras on 6 January and four on 8 February, Olympus has announced another 3 new models on 2 March. The three models are: TG-810, SZ-20, SZ-30MR.

The TG-810 will be available in Singapore in March but availability of the two new SZ series models have yet to be ascertained.

The three models and their main highlights are listed below:

Model
Date available
Estimated price
Colours
Highlights
TG-810
March 2011
S$540 

Colours:
Black
Silver
Blue
Red
– 14 megapixels CCD.
– 5x optical zoom from 28 to 140 mm (35mm equiv).
– 3” 920k dots TFT LCD display.
– HD movie (MPEG-4 AVC/H.264) at 1280 x 720 pixels with dedicated REC button. 

Battle-hardened for the rugged adventurer, this jock is:

– waterproof to a depth of 10m
– shockproof against falls from 2m
– crushproof against loads of up to 100kgf
– dustproof, freezeproof; basically abuse-proof.
– equipped with GPS and electronic compass

SZ-20
Avail: TBD
Price: TBD 

Colours:
Black
Silver

– 16 megapixels backlit CMOS.
– 12.5x optical zoom from 24 to 300 mm (35mm equiv).
– 3” 460k dots LCD display.
– HD movie (MPEG-4 AVC/H.264) at 1920 x 1080 pixels with dedicated REC button. 

For the avid traveller and sports fan, this compact has large zoom, high sensitivity sensor and good for high-speed continuous shooting. Additional features include:

– Hand-held starlight mode combines 4 exposures to eliminate blur and noise in low light.
– Smart Panorama captures up to 360-degrees.
– High-speed continuous shooting of 7 (full-size) or 15 (5 megapixels) photos per second.

SZ-30MR
Avail: TBD
Price: TBD 

Colours:
Black
Silver

– 16 megapixels backlit CMOS.
– 24x optical zoom lens from wide angle of 25 to 600 mm (35mm equiv).
– 3” 460k dots LCD display.
– HD movie (MPEG-4 AVC/H.264) at 1920 x 1080 pixels with dedicated REC button. 

Has everything the SZ-20 has, and more. Zooms twice as far. Multi recording shoots 1080p HD movies and full resolution photos simultaneously.

Common features Features that the 3 new cameras share (and together with many other recent Olympus models) include: 

– 8 Magic Filters for in-camera special effects for stills.
– 6 of them available in movie recording.
– 3D photo shooting.
– Multi Picture format for 3D photos.
– Pet mode for auto-detecting dogs and cats.
– Auto Release when dog/cat faces the camera.
– Eye-Fi card compatible.

Photo scrapbook using GIMP Layers (Part 5b of 14)

March 6th, 2011

Yesterday, we put several photos into a single scrapbook page and positioned them. In the second half of the tutorial today, we add text titles and captions to the scrapbook page/cover, complete with outlines.

Adding titles and captions

Pict 8: Options for the Text Tool

Pict 8: Options for the Text Tool

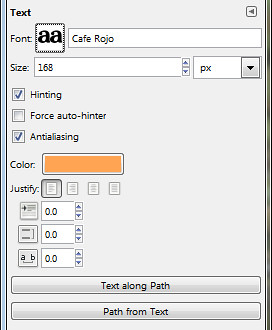
To add a title to the page, activate the Text Tool in the Toolbox. In the Tool Options, select the Font, size and colour to be used for the title of the scrapbook page. Click the square icon beside the Font label to display a list of installed fonts. Here, I used the Cafe Rojo font.

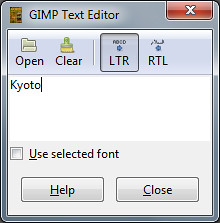
Click near the top left corner of the image to place the title. The GIMP Text Editor dialog box appears. I typed in the title “Kyoto” and pressed the Close button. A new and separate text layer is added in the Layers dialog.

Pict 9: GIMP Text Editor

Pict 9: GIMP Text Editor

To edit the text in the title, click on it in the image window with the Text Tool. The Text Editor pops up again for you to edit the text.

To reposition the title, click on it in the image window and drag. For fine adjustments of position, use the Arrow keys on the keyboard.

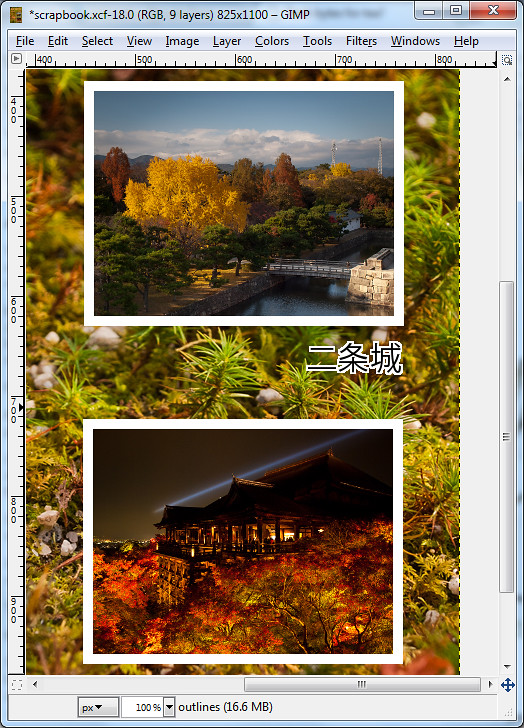
Repeat the same process to add the “Koyo” caption, the year “2010”, and the labels for the two thumbnails.

Adding outlines
Pict 10: New blank layer for the outlines

Pict 10: New blank layer for the outlines

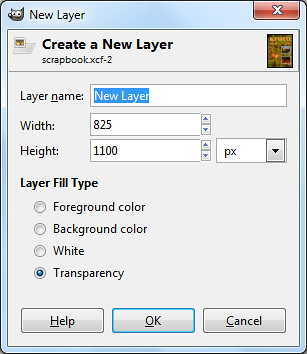
To add an EXTERNAL outline around the text and the thumbnails, first create a new transparent layer just above the Background layer and name it “Outlines”.

Select the Background layer in the Layers dialog and click the bottom left icon in the Layers dialog. Select the Transparency radio button in the New Layer pop-up dialog box.

Make sure all the elements are already in their final positions before adding the outlines, since this method adds the outlines on a separate layer. Moving an element later on will leave its outline behind in the original position.

Follow the steps below for each of the elements:

Pict 11: Add outlines or borders

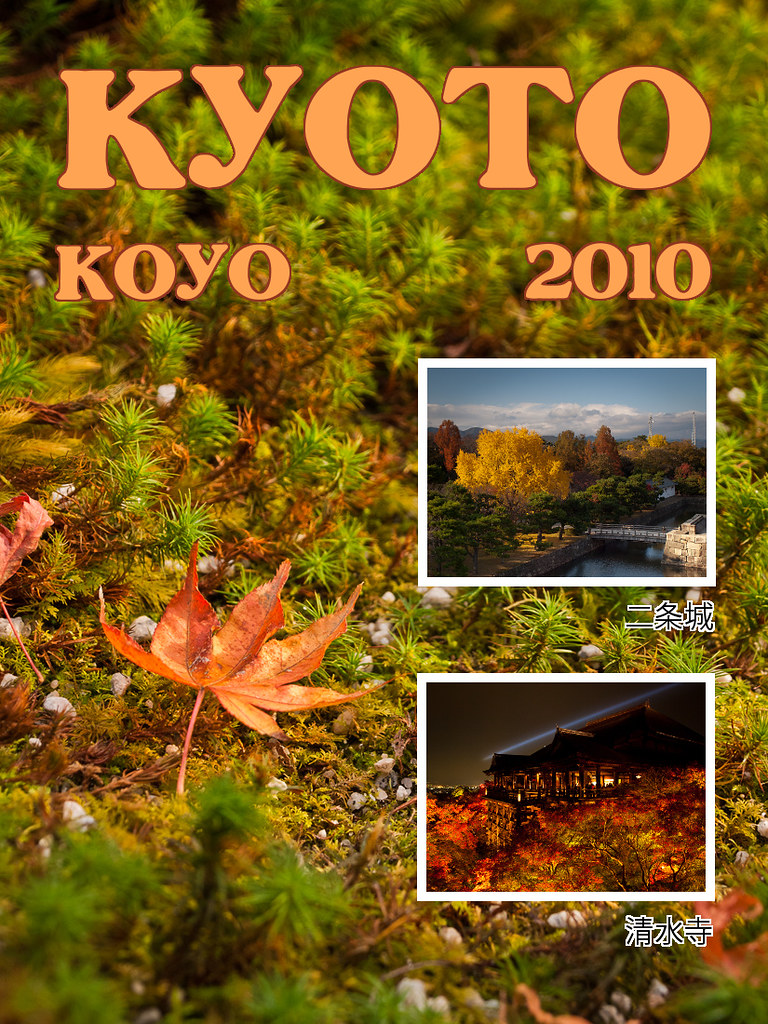
Pict 11: Add outlines or borders. Here the thumbnails show koyo scenes at Nijojo Castle and Kiyomizu Temple at night in Kyoto.

Right-click the layer and select Alpha to Selection command from the pop-up menu.

Click the Foreground Color swatch in the Toolbox and select the desired outline colour from the Change Foreground Color dialog box that pops up.

Select the Outlines layer in the Layers dialog and from the main menu, select Edit > Stroke Selection.

In the pop-up Stroke Selection dialog box, enter the width of the outline and press the Stroke button. If it it too thick or thin, press Ctrl-X to undo and try again. Experiment with the width setting until the outline looks right to you.

This adds an external outline around the thumbnail or text caption.

Note: There are many methods of adding borders/outlines to elements within GIMP – none of which are very convenient. Through experience, I find this method produces the most crisp outline for text captions.

A more convenient approach is to add the outline directly to the thumbnail or text layer itself, so that moving the thumbnail/text would move the outline as well. But I find the quality rather jagged for text layers.

Saving as source files

Pict 12: Preserve the layers in .xcf file

Pict 12: Preserve layers in an .xcf file

The completed scrapbook design now comprises several different layers which can be independently adjusted and moved without affecting other layers. Save this as a “source” file in the GIMP’s native .xcf format.

Use the File > Save As command and in the pop-up Save Image dialog box, type in the name of the file followed by .xcf.

The layers are preserved so that when you open the file in GIMP in the future, you can still manipulate the layers independently – perhaps you may decide to edit the captions, or move the two thumbnails further to the left.

Unfortunately, the .xcf file format is not a commonly accepted file format since it is only for use within GIMP. You can print it with your desktop printer but the print shop will probably not accept it.

For printing at a shop, save an additional copy of the file in JPEG, since this is a ubiquitous file format that all graphics/printing software accepts.

Use the File > Save As command and this time save the file with a .jpg extension instead of the previous .xcf extension.

Photo scrapbook using GIMP Layers (Part 5a of 14)

March 5th, 2011
Make a photo scrapbook design by combining several photos and text captions on the same page.

Scrapbook design using layers in GIMP

Pict 1: Scrapbook cover/page

There seems to be renewed interest amongst my friends to use their holiday photos to make photo scrapbooks.

They share their photos online even while they’re still overseas on holiday, but nothing beats a physical coffee-table scrapbook for family and close friends to thumb through and pore over.

In the first half of this tutorial today, we’ll use a photo as a background for a scrapbook cover/page and bring in additional photos. We’ll resize them as thumbnails and position them on the page.

In the second half tomorrow, we’ll add text titles and captions, and add outlines to them, as well as the thumbnails.

Including additional photos as layers

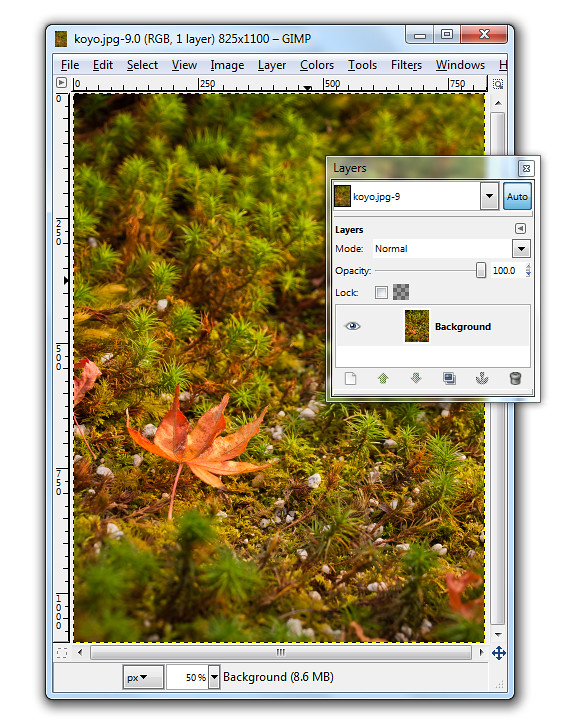
Pict 2: Single Background layer when photo is first opened.

Pict 2: Single Background layer when photo is first opened. This lonesome koyo was languishing on the grounds of the Ginkakuji in Kyoto.

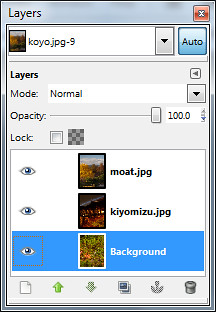
When a photo file is first opened in GIMP, it resides on the single Background layer.

In our example, the photo file comprises the macro shot of the lone koyo (red maple leaf in Japanese) in the Background layer. We want to bring in two additional photos of koyo scenes as thumbnails.

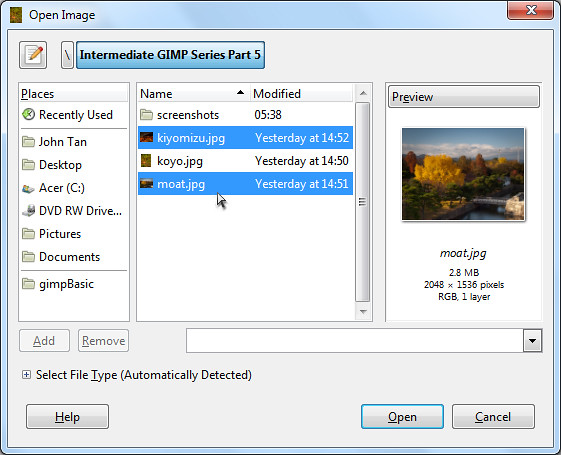
Pict 3: Bring in additional photos

Pict 3: Additional photos

To bring in additional photos into the file, use the File > Open as Layers command from the main menu. You can bring in multiple photos all at once by selecting more than one photo in the Open Image dialog box that pops up.
Pict 4: Additional photos as layers

Pict 4: Additional photos as layers

The two photos will be brought in as additional layers – one photo on each layer. For a quick introduction into layers and various ways of manipulating them, read Part 5 of the Basic GIMP series on “Correcting exposure using layers”.

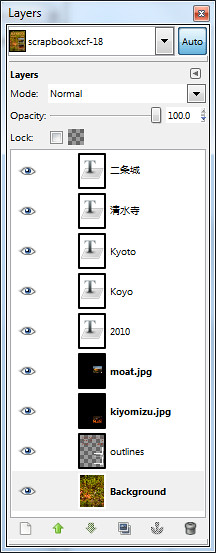
You can see the different layers in the file inside the Layers dialog.

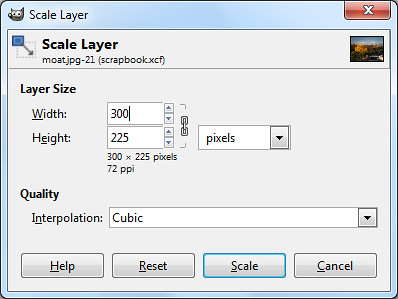
To reduce the size of the moat photo to a thumbnail, click on its name in the Layers dialog to select it and then use the Layer > Scale Layer command from the main menu. As a shortcut, simply right-click on the moat layer in the Layers dialog and select the Scale Layer command from the pop-up menu.

Pict 5: Scale layer down to thumbnail size

Pict 5: Scale layer down to thumbnail size

In the Scale Layer dialog box that pops up, I typed in 300 in the Width field. The Height field was automatically updated to 225 to keep the aspect ratio of the layer unchanged to avoid distortions. Both the default Interpolation setting of Cubic or Sinc (Lanczos3) will do the resizing with good quality.

Press the Scale button to complete the resizing.

Repeat the same process to resize the other photo into thumbnail size.

Pict 6: Move, Alignment and Text tools in the Toolbox

Pict 6: Move, Alignment and Text tools in the Toolbox

Positioning the thumbnails

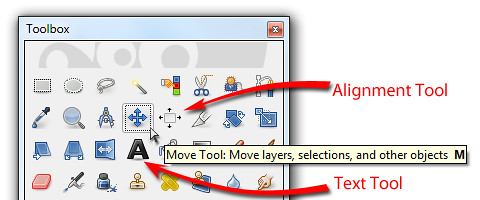
To move and position the thumbnails, activate the Move Tool from the Toolbox. Now you can just click and drag any layer you see in the image window.

Pict 7: Options for the Alignment Tool

Pict 7: Options for the Alignment Tool

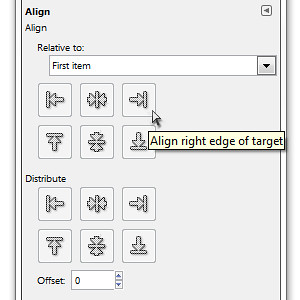
To align the two thumbnails, activate the Alignment Tool in the Toolbox. Click the first thumbnail and shift-click the second thumbnail to select both. You can also drag a rectangle that encloses both thumbnails to select both at the same time.

In the Tool Options, click one of the icons to align either the left or right edges of the thumbnails.

Tomorrow, we’ll add text captions and outlines to the elements in the scrapbook cover/page.

Interesting movie effect using Diorama mode

March 4th, 2011

The Diorama Art Filter mode in Olympus cameras gives an interesting fast-forward effect, like those you see in documentaries where a flower blooms from bud to full-bloom in seconds, or of clouds racing across the sky.

I shot the video below using the Olympus XZ-1 compact digital camera, shooting it as an HD movie while in Diorama mode.

The Diorama mode is one of six Art Filters included in the camera to add special effects in-camera to photos taken. The Diorama mode imposes an extremely shallow depth of field to simulate photos taken of miniature models.

In newer Olympus cameras, these Art Filters can also be used when shooting videos, although the frame rate or size might be different from the basic normal movie shooting mode.

In the video below, you can see only part of the track is in focus while the rest are blurred. Also, although the snippet is only 12 sec long, the actual sequence lasted more than half a minute.

Steve Jobs launches the Apple iPad 2

March 3rd, 2011
Steve Jobs emerges from medical leave to unveil the iPad 2, an evolutionary upgrade of its predecessor, making it thinner, lighter and faster.

The iPad 2 now comes in white, and its thinner, lighter and faster.The iPad 2 was unveiled as anticipated on 2 Mar at the Yerba Buena Center for the Arts in San Francisco. Specifications were in line with virulent speculations prior to the event. What was more uncertain was whether Steve Jobs would helm the launch.

He did, and Apple’s stock price rose $2.81 to $352.12 on the Nasdaq in a sign of investor confidence. The stock has risen 9.2% this year.

Steve Jobs has been on medical leave since 17 Jan but had stated that he would still “be involved in major strategic decisions for the company.” He is on his third period of medical leave in seven years and there has been rife rumours about how dire his health has become. For some, his attendance at the event was as important as the launch of the new tablet.

The cover is attached using magnets and doubles up as a stand.With 350,000 apps on the Apps Store, with 65,000 dedicated to the iPad 2, the tablet will hit US shelves on 11 March and ship internationally on 25 March. The $499 starting price is the same as the original iPad when it was first launched in Apr 2010.

Competitors already in the market include the Samsung Galaxy and Motorola Xoom – both Android-based tablets. Research In Motion plans to release four versions of its Playbook this year while HP will roll out the WebOS-based Touchpad.

Here are the more noteworthy features of the iPad 2:
The cover comes in 10 colours.

  • It’s available in white.
  • Has 2 cameras for video conferencing: one front (VGA-quality), one back(720p).
  • Faster: New A5 dual-core processor claimed to be twice as fast as the previous iPad.
  • Faster: Graphics performance nine times faster than before.
  • Thinner: by one-third to 8.8mm.
  • Lighter: 1.3 pounds from 1.5 before.

Optional extras:

  • Optional $39 HDMI adaptor that connects the iPad’s 30-pin port to an external display so that iPad’s display is mirrored on the external display.
  • New magnetic protective case that puts the iPad to sleep when it is closed. Bendable and doubles up as an iPan stand. Comes in 10 colours (plastic ones: $39, leather: $69).
  • iMovie and Garageband as Apps at $4.99 each on the Apps store

Pricing (original iPads are now $100 cheaper):

Attached using magnets, the flexible cover puts the iPad 2 to sleep when covered.1. Wi-Fi only versions:
  • 16GB: $499
  • 32GB: $599
  • 64GB: $699

2. Wi-Fi/3G devices:

  • 16GB: $629
  • 32GB: $729
  • 64GB: $829

Photo review of the Olympus XZ-1

March 2nd, 2011

The XZ-1 is the flagship compact digital camera from Olympus. It stays compact despite packing in the image quality and manual control of entry level DSLRs, plus a host of other nifty features.

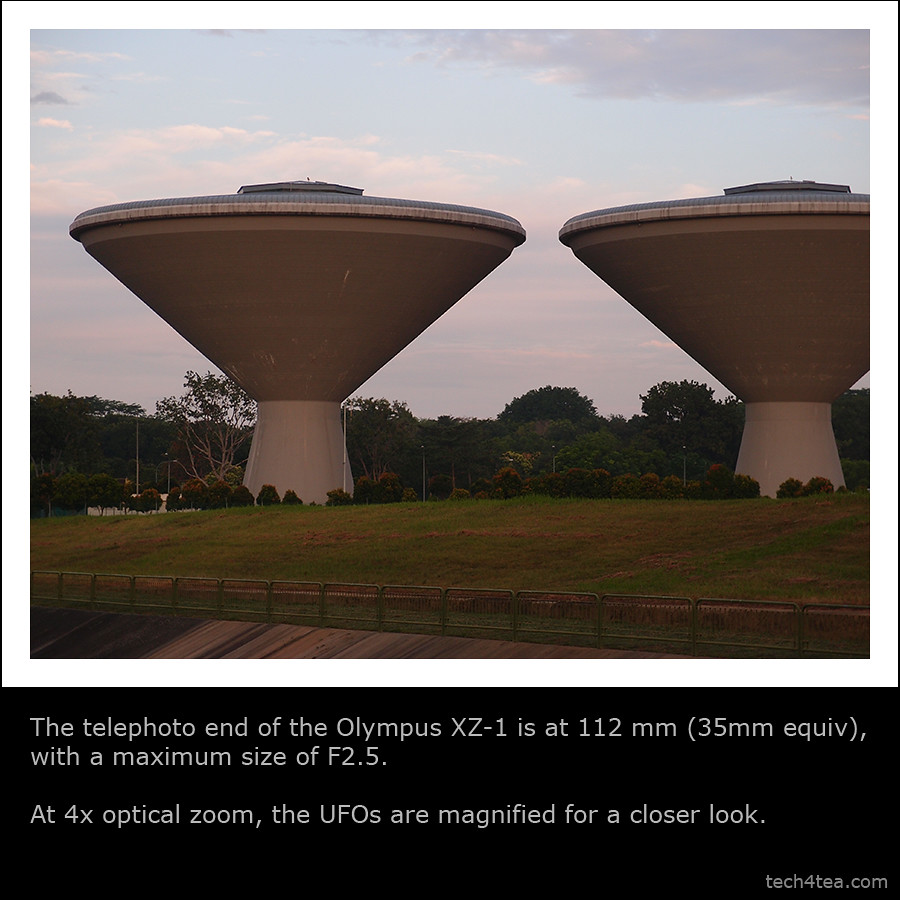
Olympus XZ-1The XZ-1 is a 10-megapixel high-end compact with 4x optical zoom from 28mm to 112mm (35mm equivalent). It records HD movies, has a 610k dots OLED display and features 6 Art Filters that can be applied to movies recorded. The camera comes in black or white and retails at S$748 (incl GST).

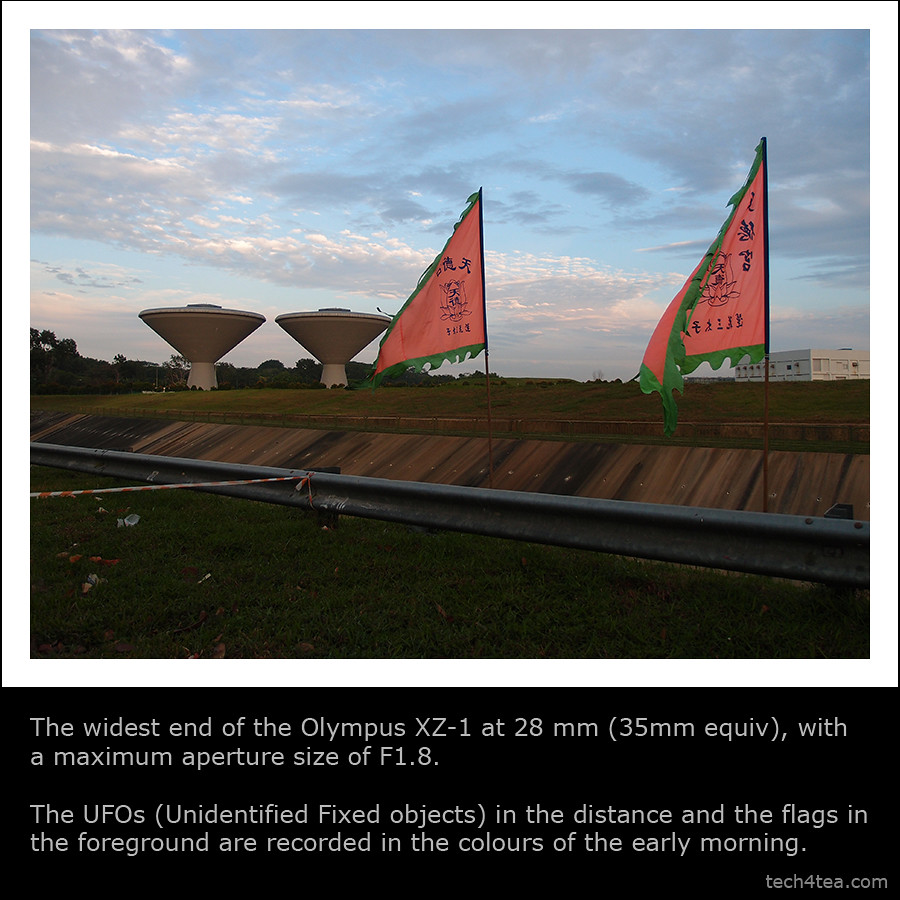
Hopefully these photos will provide a better idea of what the camera can and cannot do.

Listed here are some earlier write-ups on the Olympus XZ-1:
Full review | Detailed specs | Main selling points | Diorama movie

Photo review of the Olympus XZ-1

Wide angle at 28mm

Telephoto end at 112mm (35mm equiv)

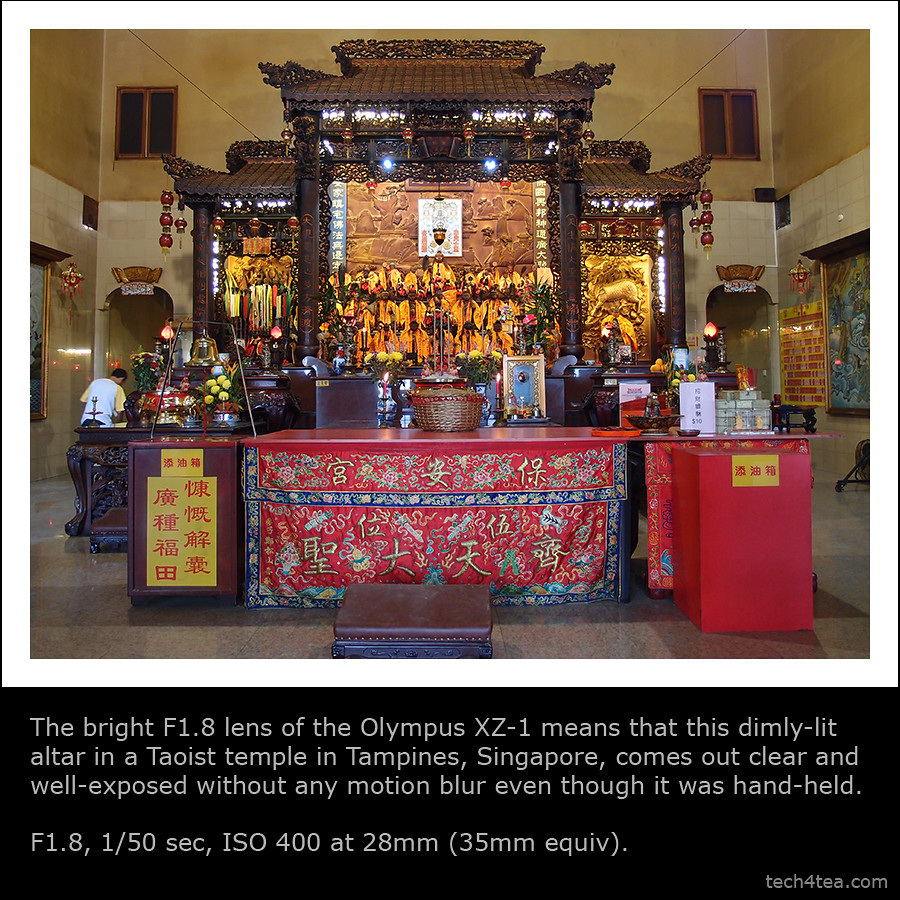
F1.8 for low light

Read the rest of this entry »

Review of Olympus XZ-1

March 1st, 2011

This flagship compact digital camera from Olympus is ideal for those looking for a shooter which is compact yet provides image quality and control that rivals entry-level DSLRs.

I’ve played with the Olympus XZ-1 for the past two weeks. It is an impressive bridge camera that is compact, yet packs in a punch in terms of image quality and a whole range of nifty features.

If you’re using a compact digital now and wants to move on to manual controls and better image quality, without the hassle of changing lens, this camera is for you. It is also suitable as a second camera for those already using DSLRs because of its compactness.

Olympus XZ-1

You can see its detailed specs here and the main selling points here. Check out the photo review of the XZ-1 here.

Basically, it is a 10-megapixel high-end compact with 4x optical zoom from 28mm to 112mm (35mm equivalent). It records HD movies, has a 610k dots OLED display and features 6 Art Filters that can be applied to both stills and recorded movies. The camera comes in black or white and retails for S$748 (incl GST).

In terms of size, it is small enough to slip into a jacket pocket and carried everywhere you go, especially when travelling light on vacation.

Mode dial on the Olympus XZ-1For complete beginners, there is the usual everything-automatic mode (iAuto) that takes care of all shooting settings for you. There are also 18 scene modes with pre-canned settings catered for specific photographic situations from the usual portrait and landscape modes to more unusual modes like e-Portrait, Underwater (Macro or Wide), Multi-Exposure, Cuisine, Pet etc.

Its Live Guide interface in iAuto mode allows even novices to exercise some amount of control to deviate from the camera’s recommendations. The onscreen menu allows users to intuitive control how the photo should be captured by changing the colour, brightness and background blur without knowing anything about specifics like aperture, shutter speed, white balance etc.

The much touted F1.8 maximum aperture at its widest angle of 28mm (35mm equivalent) works as advertised. What is less noticed but nevertheless impressive is that even at the long end at 112mm, the maximum aperture is only 2.5.

The fast lens means that for low-light photography, you can still take pretty good exposures with fast shutter speeds so that photos remain sharp even when the camera is hand-held.

No need for tripods that add bulk to your travel bag, flash that kills the ambience, high ISO that introduces noise and loses detail, or motion blur due camera shake duing long exposure.

Large sensor for a compactTogether with its relatively large 1/1.63” sensor, it provides image quality and depth of field that I found comparable to some entry-level DSLRs that I’ve used in the past. The image processing engine – TruePic V – is the same one used in the Pen series of cameras.

And together with its Auto-tracking feature, I used it to capture moving children and pets rather successfully.

The camera comes with 6 Art Effects, which includes the new Dramatic Tone filter introduced with the E-5, the flagship DSLR from Olympus. I like the special effects applied in-camera. No need to wait till the photos are uploaded to the PC before using a photo-editor to add those effects.

The Soft Focus filter looks much improved from those I’ve seen in earlier cameras from Olympus, with skin textured nicely smoothed out without blurring the eyes excessively.

Dedicated button for one-touch recording of movies.Shooting HD video is a cinch with a dedicated record button. No need to fumble through complicated on-screen menus. Recording movies using Diorama mode is pretty cool, like a video on fast-forward.

I found the panorama mode easy to use and the stitching of the triple exposures seamless.

The 610k dots OLED monitor is bright and can be seen quite clearly even under sunlight and has a wide angle of viewing.

The tactile control ring around the lens.The control ring around the lens is a pleasure to use. It is tactile and responsive and provides immediate adjustments to the main setting for each shooting mode (eg. aperture setting in Aperture Priority mode).

For those who wants to get the most from their photos, the camera records 12-bit RAW and/or JPEG. You should get a lot more data from RAW for creative tweaking, even though the JPEG rendering from the TruePic V engine already does an excellent job.

I also like the built-in ND filter that lets in less light to allow the use of slower shutter speeds and/or wider apertures for creative effect.

The wheel control at the rear panel.Areas to improve? I wished there is a more direct way to access ISO and White Balance settings, rather than using the menu. I also found the wheel controller (around the arrow navigation keys on the rear panel) too slow when making large adjustments, say of the shutter speed. But this is highly subjective and I suspect it’s because I’m spoilt by the more tactile lens ring.
Overall, the Olympus XZ-1 is a compelling all-rounder – compact, yet delivers great image quality and allows manual control.

Select by Color or Foreground Select Tools in GIMP (Part 4 of 14)

February 27th, 2011

These less frequently used selection tools can be real time-savers if you know when they are the most suitable tools for the job.

The Fuzzy Select Tool works wonders for selecting large contiguous areas of a photo with relatively uniform colour even if the outline is complicated.

In yesterday’s case, clicking on the blue sky around the temple in the photo selected all the blue pixels “connected” to the clicked pixel by other selected pixels.

Select by Color Tool

If, say there is a window in the temple showing a bit of blue sky through it, those blue pixels won’t be selected when the Fuzzy Select Tool is clicked outside the outline of the temple.

Similarly, if the cursor is clicked inside the window showing the blue, the blue sky around the temple won’t be selected.

To add such segregated areas to the main selection, hold down the Shift key on the keyboard and click on those areas with the Fuzzy Select Tool.

For more control, I tend to prefer using the Fuzzy Select Tool together with the Shift key.

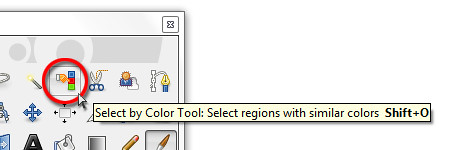
Select by Color Tool in the GIMP Toolbox

But if there are many isolated areas to be selected, a more suitable tool is the Select by Color Tool.

The Select by Color Tool works exactly like the Fuzzy Select Tool except that pixels from the ENTIRE photo that are similar in colour to the clicked pixel are selected – whether contiguous or segregated.

Foreground Select Tool in the GIMP Toolbox

Foreground Select Tool in the GIMP Toolbox

Again, the Threshold value determines how similar a pixel should be in order to be selected.

So if the temple had many windows showing blue skies, clicking a blue pixel in any one of the windows would select all the blues pixels in the sky.

Unfortunately, any of the tourists wearing blue will also have their blue clothes selected. That’s why I tend to prefer the Fuzzy Select Tool because it allows me to control exactly what I want to select.

Foreground Select Tool

Another selection tool that can occasionally work wonders is the Foreground Select Tool. It is used to select an object in a photo against a background, preferably with contrasting colours (see above Picture).

Wild pink flower in Magome, Japan

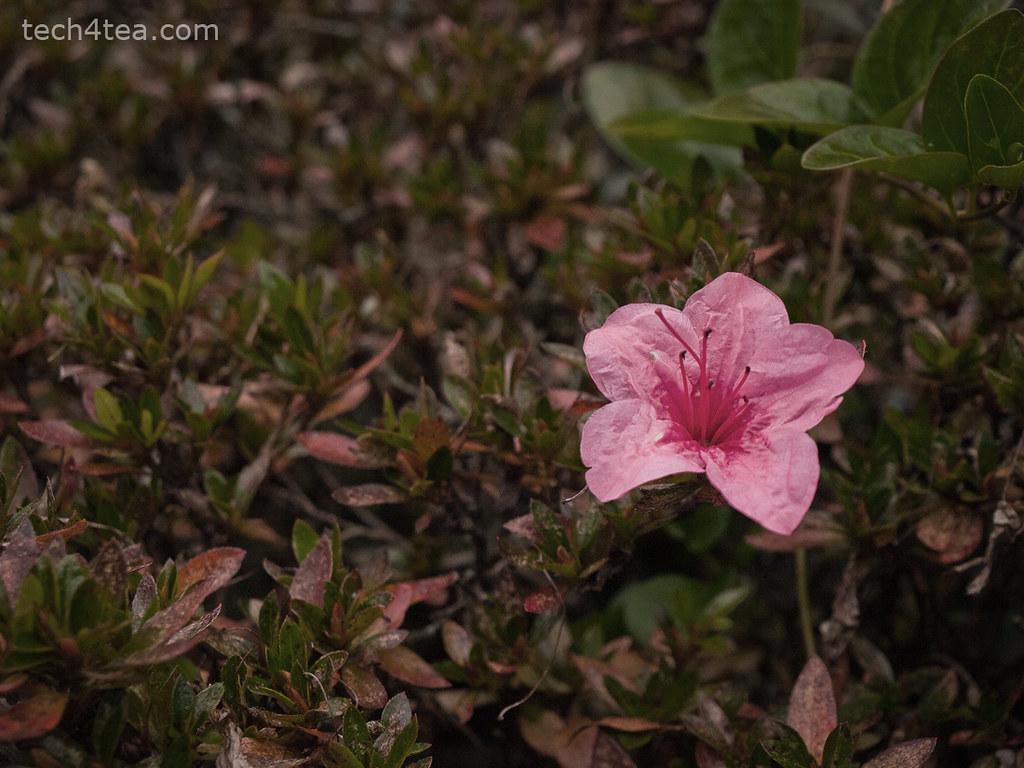
This wild flower looks a tad pale and dull on an overcast day.

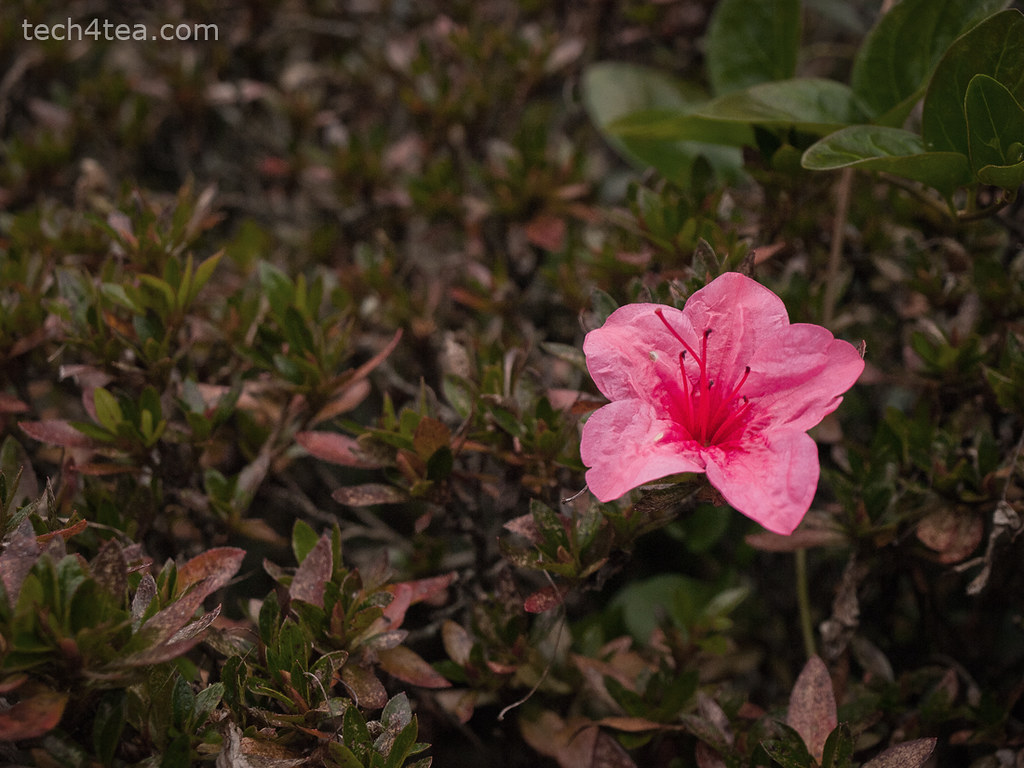
Pink flower made more vivid

The pink flower now stands out against the pale background.

In the photo of a wild flower I snapped in Magome, Japan, Iet’s select the flower in order to make the pink more vivid against the surrounding grass. Download the Before photo to follow along.

Activate the Foreground Select Tool from the Toolbox.

The cursor turns into a lasso. Use the cursor to drag an outline outside but around the flower. For selecting the outline, the tool behaves like the Free Select Tool. Select close to the outline of the flower but do not stray inside the flower.

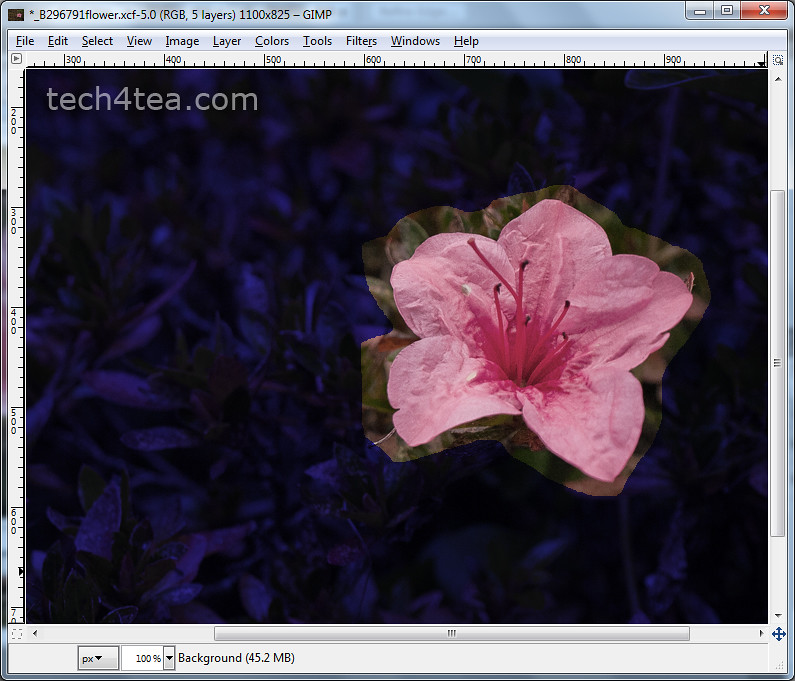
The initial mask when the flower is first outlined

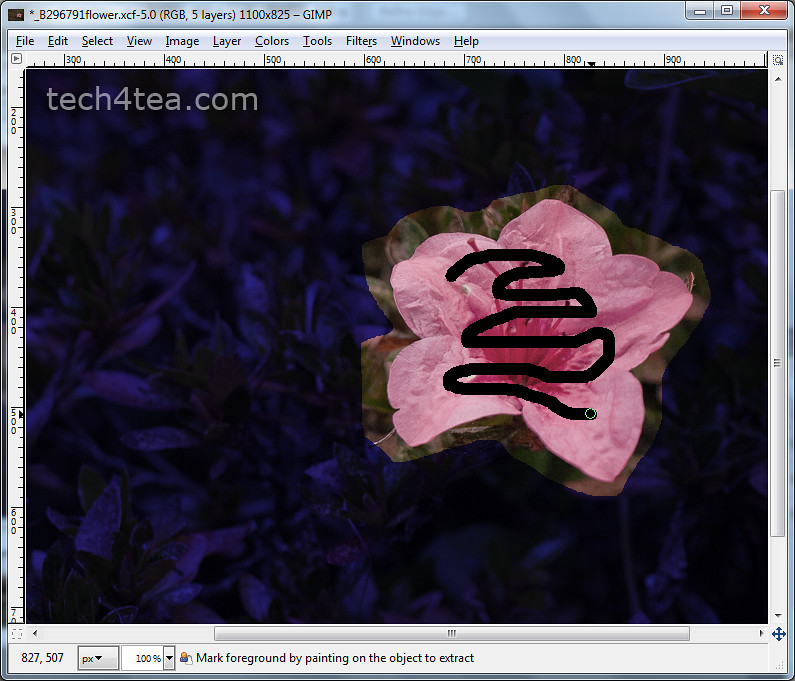
Paint inside the flower to define what colours to keep

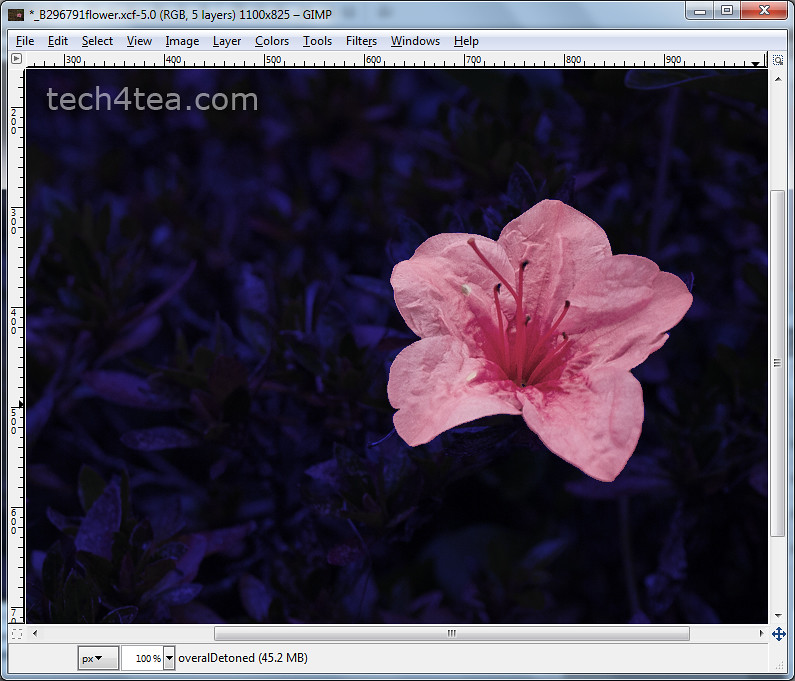
GIMP adjusts the mask to the flower's borders

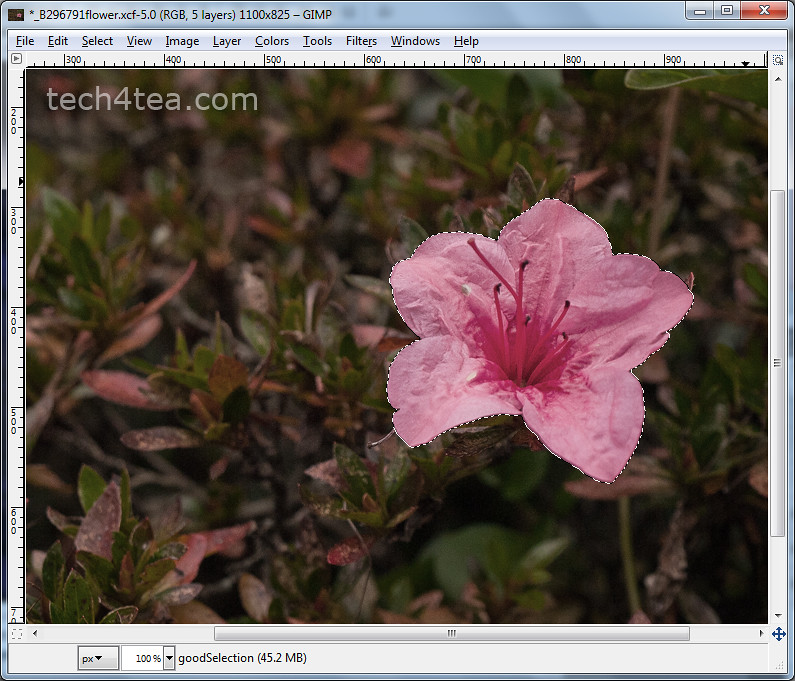
Pressing Enter converts the mask into a selectionVarious stages of using the Foreground Select Tool. Click each thumbnail to open enlarged photo.

Once the outline is complete, GIMP overlays the area outside the outline with a dark blue translucent mask, while the appearance of the flower and its immediate surrounding inside the outline remains unchanged.

The cursor now changes into a paintbrush. Paint inside the flower.

There is no need to paint the entire flower. If the flower contains different colours, try to paint over the different colours to tell GIMP they are part of the flower. Avoid painting outside the flower.

After the initial painting, the dark blue mask closes in so that only the flower remains visible. The clearly visible areas indicate the areas that will be selected. In this case, GIMP did a perfect job.

You can still modify the mask if the flower had not been perfectly masked.

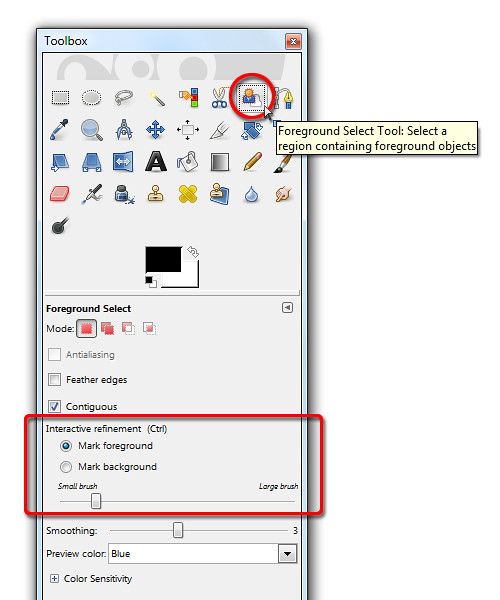
In the Tool Options are two radio buttons that determines the effect of painting on the photo.

By default, the “Mark foreground” option is selected. If there are parts of the flower that are covered by the blue mask, paint on those areas to unmask them.

If there are areas outside the flower that are not masked in dark blue, select the “Mark background” option in the Tool Options and paint on those areas to mask them.

To work the details, zoom in and vary the brush size by dragging the slider in the Tool Options.

Once the mask has been finetuned so that only the flower is clear and the surroundings are masked by the translucent dark blue, press Enter on the keyboard to convert the mask into a selection.

You can now make the flower stand out by dialing up the vividness using Colors > Hue/Saturation command from the main menu.

Caution: While outlining the flower or painting to define the area to be included or excluded, Ctrl-Z or the Edit > Undo command does not work. To restart the selection process, select some other tool in the Toolbox and then select the Foreground Select Tool again.

Do magic with Fuzzy Select in GIMP (Part 3 of 14)

February 26th, 2011

Select objects with uniformly coloured backgrounds easily even if the objects have complicated outlines.

Previously, we have made simple rectangular and elliptical selections in photos using GIMP’s Rectangle and Ellipse Select tool. We’ve also used the Free Select Tool to select objects with irregular outlines.

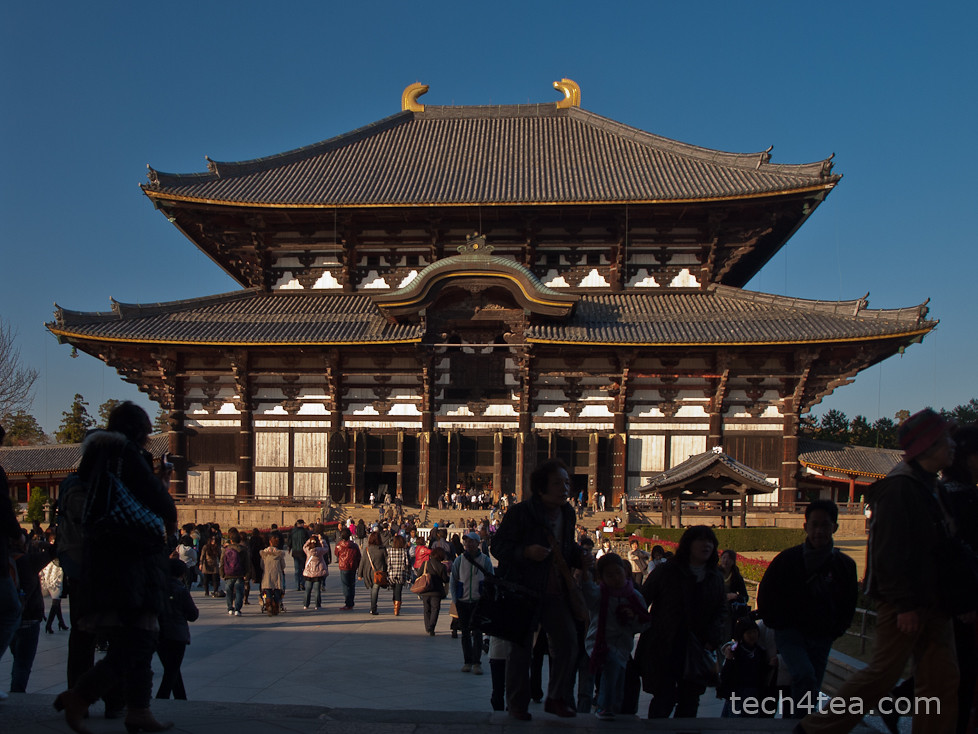
Todaiji Temple in Nara, Japan - a UNESCO World Heritage Site

Pict 1: The Todaiji temple as seen against a clear blue sky.

These selections allow us to do local adjustments – whatever adjustments we make are confined to only the pixels within the selection boundaries.

Sometimes, the object we want to select in the photo is against a background with uniform colour, such as the sky, where the colour comprises a narrow range of tones of the same colour (see Picture 1).

In these cases, it is easier to select the uniform background using the Fuzzy Select Tool and then invert the selection rather than try to select the object itself – especially if the object has a complicated outline.

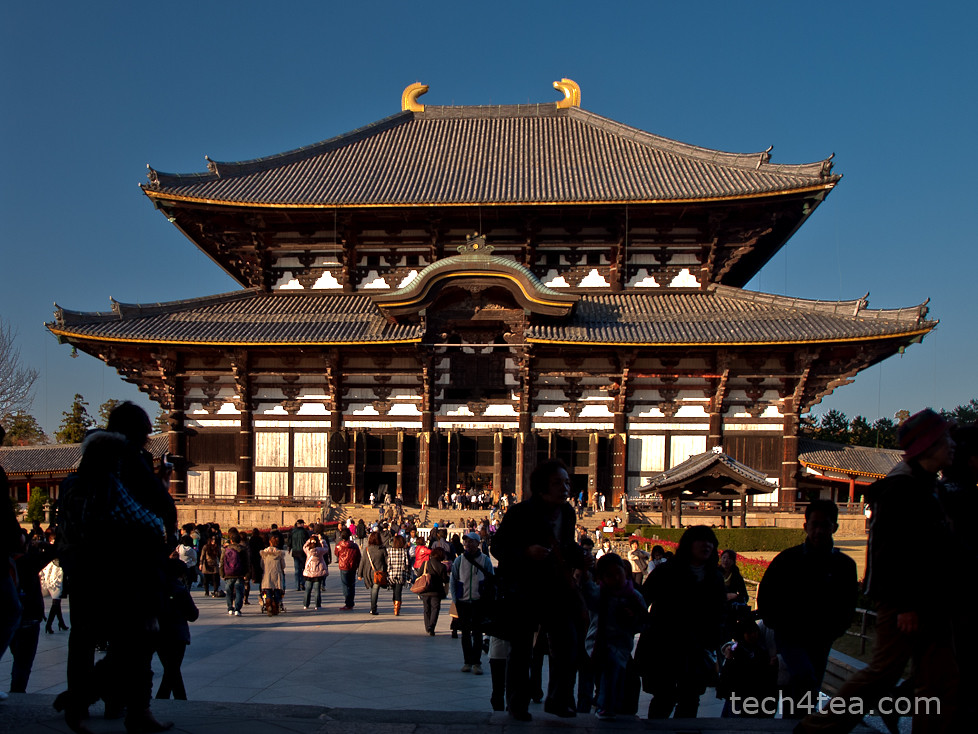
Temple after brightness and contrast increased

Pict 2: The temple has been lightened up and contrast increased.

The tool works best when the background colour is markedly different from the object to be selected.

In the photo of Todaiji in Nara, the temple is slightly underexposed and flat against the bright sky. I want to lighten up the temple without whitening out the nice blue sky. So I need to select the temple and the foreground scene before applying the lightening (see Pict 2).

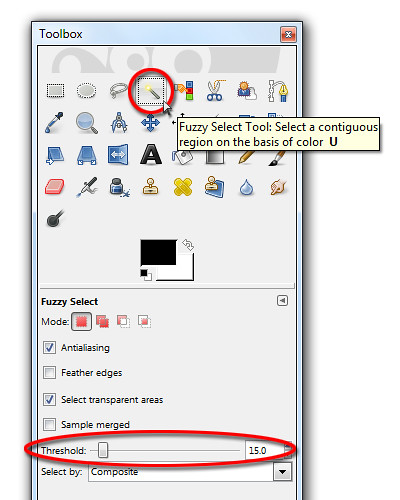
Fuzzy Select Tool

Activate the Fuzzy Select Tool from the Toolbox.

Activating the Fuzzy Select Tool from the Toolbox

It is known more commonly in other photo-editing programs as the Magic Wand tool because of its ability to make a complex selection seem so easy – where large welts of relatively uniform colour are involved. In fact, the symbol and cursor for the tool in GIMP comes in the form of a magic wand.

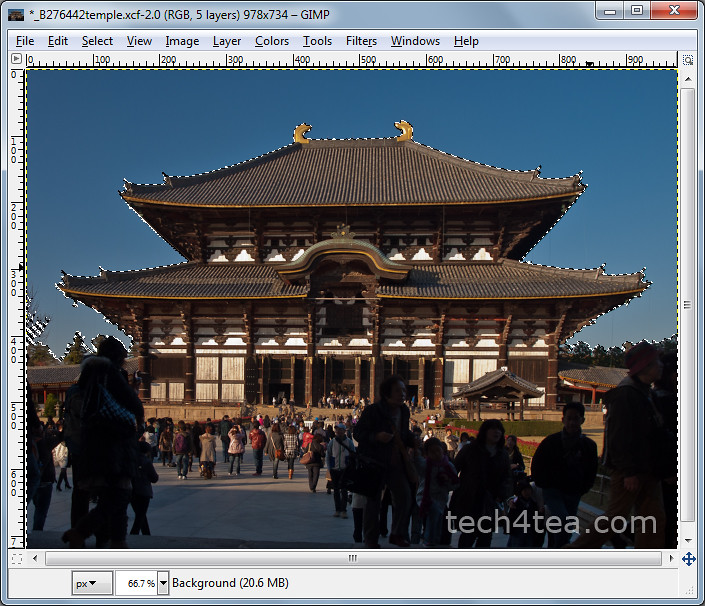
Click on any part of the blue sky. Large parts of the blue sky are selected as indicated by the marching ants showing the complex boundary of the areas selected. What has happened is that the Fuzzy Select Tool has selected all pixels of similar colour to the pixel that was clicked by the tool.

How similar must a pixel be to the clicked pixel for it to be selected? This is determined by the Threshold slider in the Tool Options.

Changing the default value from 15 to zero means that only pixels whose colour is exactly the same as the clicked pixel is selected. Using the maximum value of 255 means all pixels in the photo will be selected.

The selection process

There is a shortcut to varying the Threshold value while using the Fuzzy Select Tool. When you first click in the area to be selected, don’t release the button just yet.

Drag the mouse to the right or downwards and the Threshold value will be increased. You can see the selected areas grow as you drag the mouse cursor. You can also see the Threshold slider in the Tool Options moving to the right.

Conversely, drag the mouse to the left or upwards to decrease the Threshold value. You will see the selected areas shrink as you drag the mouse cursor. The Threshold slider also moves to the left.

Fuzzy Select Tool in action

Pict 3: The bright blue sky is selected by the Fuzzy Select Tool.

Stop or drag the mouse cursor in the opposite direction when you see the selection spilling into the temple itself. Release the mouse button to confirm the selection (see Picture 3).

If there are areas in the sky, that are not selected, hold down the Shift key on the keyboard and click in those areas to add them to the existing selection.

If the photo includes many isolated areas of the colour to be selected, use the Select by Color Tool instead.

Lighten up the temple

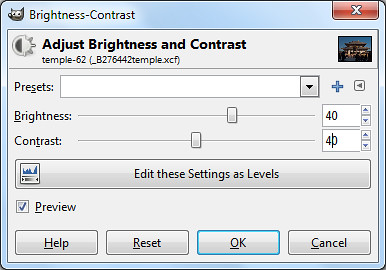
The Brightness and Contrast sliders were increased to 40 to liven up the temple.

For the moment, the blue sky is selected while the temple and the foreground are not.

To invert the selection, press Ctrl-I or Select > Invert from the main menu. The temple and the foreground are now selected while the blue sky is unselected.

The temple and the foreground can now be lightened (for instance, with the Colors > Brightness-Contrast command) without blowing out the sky.