For photos with people in them – especially those with close-up shots – sharpening can emphasize the texture and blemishes on the skin and face. Instead, try simulating a soft focus effect.
To achieve this effect, photographers in the past used to attach special lens filters or even fit stockings over the camera lens. You can, however, emulate this effect easily in GIMP.
Duplicate the background layer
In GIMP, duplicate a copy of the photo by selecting Layer > Duplicate Layer command from the main menu. Change the Layer Mode for the duplicated layer to “Screen”. You can do this by clicking the dropdown box at the top of the Layers dialog and selecting Screen from the list. The photo is brightened up but still in sharp focus.

Pict 3: Duplicate the photo, blur it and set the Layer Mode to "Screen".
The duplicate copy sits above the original photo (see Picture 3). Apply Filters > Blur > Gaussian Blur command to the duplicate copy. Start with the default setting of five and press OK. Don’t worry if the preview thumbnail shows the image in the duplicated copy to be excessively blurred (see Picture 4). The combination of the two layers via the screen layer mode results in a dreamy glow to the photo.
If the effect is not strong enough, apply the Gaussian Blur filter a second time to the duplicated layer. If the effect is way too strong, press Ctrl-Z to undo and then reapply the filter with a smaller setting.
To finetune and reduce the intensity of the effect, reduce the opacity of the duplicated layer. Simply drag the Opacity slider at the top of the Layers dialog. I usually use an opacity of between 60 and 80.

Pict 4: Apply the Gaussian Blur filter on the duplicate layer.
This effect can also be applied to non-portrait photos to add a dreamy atmosphere to the photo.
Adding a sharpened layer

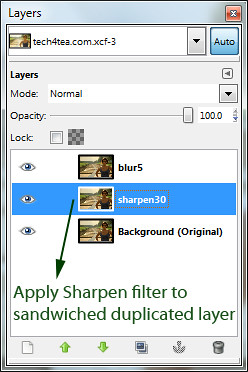
Pict 5: The sharpened duplicate layer should be just above the background layer.
If the features of the portrait (such as the eyes or the lips) becomes too blurred as a result of the effect, duplicate an additional copy of the original photo in the background layer. Select the background layer before activating the Layer > Duplicate Layer command from the main menu
Apply the Filters > Enhance > Sharpen filter to this new duplicate copy. This layer should sit above the background layer but below the other layers created earlier (see Picture 5).
The sharpened layer will add back some sharpness to the edges in the final outcome.
Tomorrow, we’ll use GIMP give portraits a digital makeover.
Tags: GIMP, image editor, photo editor, tips

